
Keeping up with your meetings and commitments is an important part of being professional, regardless of which industry you work in. It is relatively easy if you have a few meetings in a week but what if you have multiple meetings every day and have to juggle through multiple calendars to keep up with your schedule.
It can be difficult but you can get around the problem by consolidating all your calendars. To do this, you need to learn how to export your Google Calendar to Google Sheets and to do that you need to use the Google Calendar API.
How does Calendar API help you export events from Google Calendar to Sheets
When you want your Google Calendar, Google Sheets, and personal assistant to collaborate, you’ll need the Google Calendar API to integrate them all together.
In this series you will be learning how to export Gmail Calendar with Google Apps Script:
(1) Importing events from your Google Calendar into your Google Sheets
(2) Add Google Meet links to Calendar Events
How to export Google Calendar to Google Sheets: 4 Steps
Since we’ll be working on synergizing Google Calendar with Google Sheets in this blog post, it will be the first part of the Calendar API Tutorial Series.
Remember, the steps and code in this blog post will help you import your Google Calendar events into a Google Sheet. This guide won’t focus on a Google Sheets to Google Calendar script. This shouldn’t stop you from exporting multiple Google Calendars into a single Sheet though. Even this would help you consolidate all your events in one place.
So let’s get started.
If you prefer to watch a video instead of read, we've got you covered:
Step 1: Sample Google Spreadsheet and Calendar
The Google Sheet that I will be using in this blog, contains the following details.
- Name of the Event
- Start date/time of the Event
- End date/time of the Event
- Location of the Event
- Description of the Event
- Visibility of the Event
- Start Date/Time
- End Date/Time
- Calendar ID

Step 2: Add the Google Calendar API to Sheets to export Google Calendar
- To add the Google Calendar API, follow these steps:
Open the Script Editor. To open the Script Editor, follow these steps :
(1) Click on the Tools button next to the Add-ons button.

(2) Next click on the Script Editor option. This brings up the Script Editor as
shown below.

We have reached the Script Editor.
(3) Go to the left side of the Script Editor and click on the Add a Service button.

On clicking on Add a Service, you will see the following Services you can add to your Google Apps Script Project.
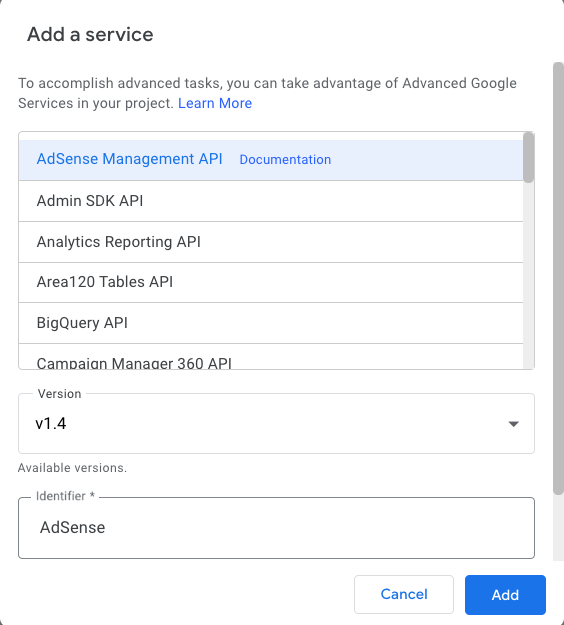
Scroll down to Google Calendar API and select it.

After selecting the Google Calendar API, click on Add.
The Google Calendar API has successfully been added to the Project.
Step 3: Write the Google Calendar to Google Sheets Script to Automate Google Calendar Events Transfer
We have already opened the Script Editor, it’s time to write the Google Sheets and Google Calendar script.
function create_Events(){
(1)  var ss = SpreadsheetApp.getActiveSpreadsheet();
(2)  var sheet = ss.getSheetByName("GetEvents");
(3)  var id_cal = sheet.getRange(“C2”).getValue();
(4)  var cal= CalendarApp.getCalendarById(id_cal);
Declaring the function :
- Get the Active Spreadsheet through the getActiveSpreadsheet Google script function
- Get the sheet by name through the getsheetbyname Google script function
- Get the Calendar ID from the sheet using the getRange app Script function followed by getting the value
- Next using the CalendarApp and the calendar ID we have got the calendar.
To get the Calendar ID, follow these steps :
- Open your Google Calendar
- Select the Calendar that you are going to use and click on the three dots next to it.

3. Click on Settings and Sharing

4. Scroll down to Integrate Calendar.
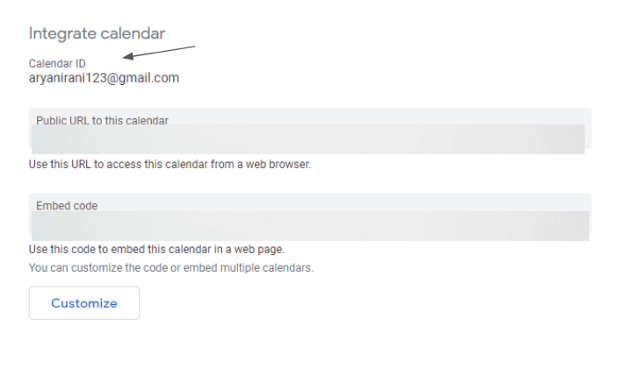
Copy the Calendar ID and paste it into the getCalendarById function.
(1)   var start_time = sheet.getRange(“G2”).getValue();
(2)   var end_time  = sheet.getRange(“H2”).getValue();
(3)   var events = cal.getEvents(new Date(start_time), new Date(end_time));
Here we have got the start and end time from the sheet, between which we want all the events. To do that we have used the getRange function and specified the range followed by getting the values using the getValue function.
Now, whenever the user wants to change the start and end time all he has to do is change the details in the sheet and run the script.
These values will be stored in the events variable. We are going to do this using the getEvents function followed by the start date and end date.
for(var i = 0;i<events.length;i++){
    var title = events[i].getTitle();
    var start_time = events[i].getStartTime();
    var end_time = events[i].getEndTime();
    var loc = events[i].getLocation();
    var des = events[i].getDescription();
    var vis = events[i].getVisibility();
Here we have created a for loop that will go through all the events that we created in the Google Calendar. Using the for loop we are going to get the following details from the events in the Google Calendar :
- Title of the event
- Start time of the event
- End time of the event
- Location of the event
- Description of the event
- Visibility of the Event
sheet.getRange(i+5,1).setValue(title);
sheet.getRange(i+5,2).setValue(start_time);
sheet.getRange(i+5,3).setValue(end_time);
sheet.getRange(i+5,4).setValue(loc);
sheet.getRange(i+5,5).setValue(des);
sheet.getRange(i+5,6).setValue(vis);
   }
Logger.log("Events have been added to the Spreadsheet");
     }
Now that we have got all the calendar events in the variables. It's time to send the data back to the sheet. To do that we are going to start by getting the range followed by setting the values using the setValue command, followed by the variable that you want to set. Here the i+5 denotes the 5th row in the sheet and the 1 specifies the column. The column number keeps increasing with new values.
After we set the values we print a confirmatory message using the Logger.log function that says “Events have been added to the Spreadsheet”.
We are done with our code.
Step 4: Check if the Google Calendar Backup to Google Sheets Worked
Our code is complete but we need to check if the Google Calendar export to Google Sheets was successful.
. Select the correct function (getEvents) as shown below and run the program. Or you can run the code using a trigger, macros and more. Check out the link below to know more.

On successful execution, the script will add all the events to the Spreadsheet.

Here you can see all the details have come into the sheet :
- Title of the event
- Start and End time of the event
- Location and Description of the event
- Visibility of the Event
Summary: How to export events from Gmail Calendar to Google Sheets
We saw how you can add calendar to Google Sheets using the Calendar API and Google Apps Script. To sum up :
- Created the spreadsheet
- Added some events to the Google Calendar
- Accessed the sheet by name
- Got the Calendar by ID
- Specified the start date and end date between which we want the events
- Created a for loop to go through each of the events in the Google Calendar
- Stored all the event details into variables
- Set the values back into the sheet
I hope you have understood how to add Calendar Events into your spreadsheet using the Google Calendar API and Google Apps Script. In the next blog, I am going to show you how to Create Calendar Events in Google Calendar using the Google Calendar API and Google Apps Script.