How to Create a Template in Gmail with Attachments
Updated 9 min read
Table of contents
Gmail templates don't keep attached files, so you can't save one with a file attached. What a template does keep is a link. So put the file in Google Drive and add it as a Drive link: it comes back every time you use the template.
Below is the step-by-step guide to creating an email template in Gmail with that link. If each person needs their own file, like an invoice or a certificate, a template can't do it, but a mail merge can. That's the section after the steps.
A quick overview of how to make an Email template in Gmail with attachments
We’ll dive into each of these steps in-depth later on, but for now, here’s a quick look at what you need to do to create a Gmail template with an attachment:
- Turn on templates in your Gmail settings
- Create a template
- Add an attachment to it via Google Drive
- Save the template
- Begin using it
Bonus: Use a mail merge tool like YAMM to add personalization and track large batches of templated emails.
Here’s all you’ll need to create an email template with attachments in Gmail
- A Gmail account
- An attachment
- A message you want to send
Step 1: Turn on templates in Gmail settings
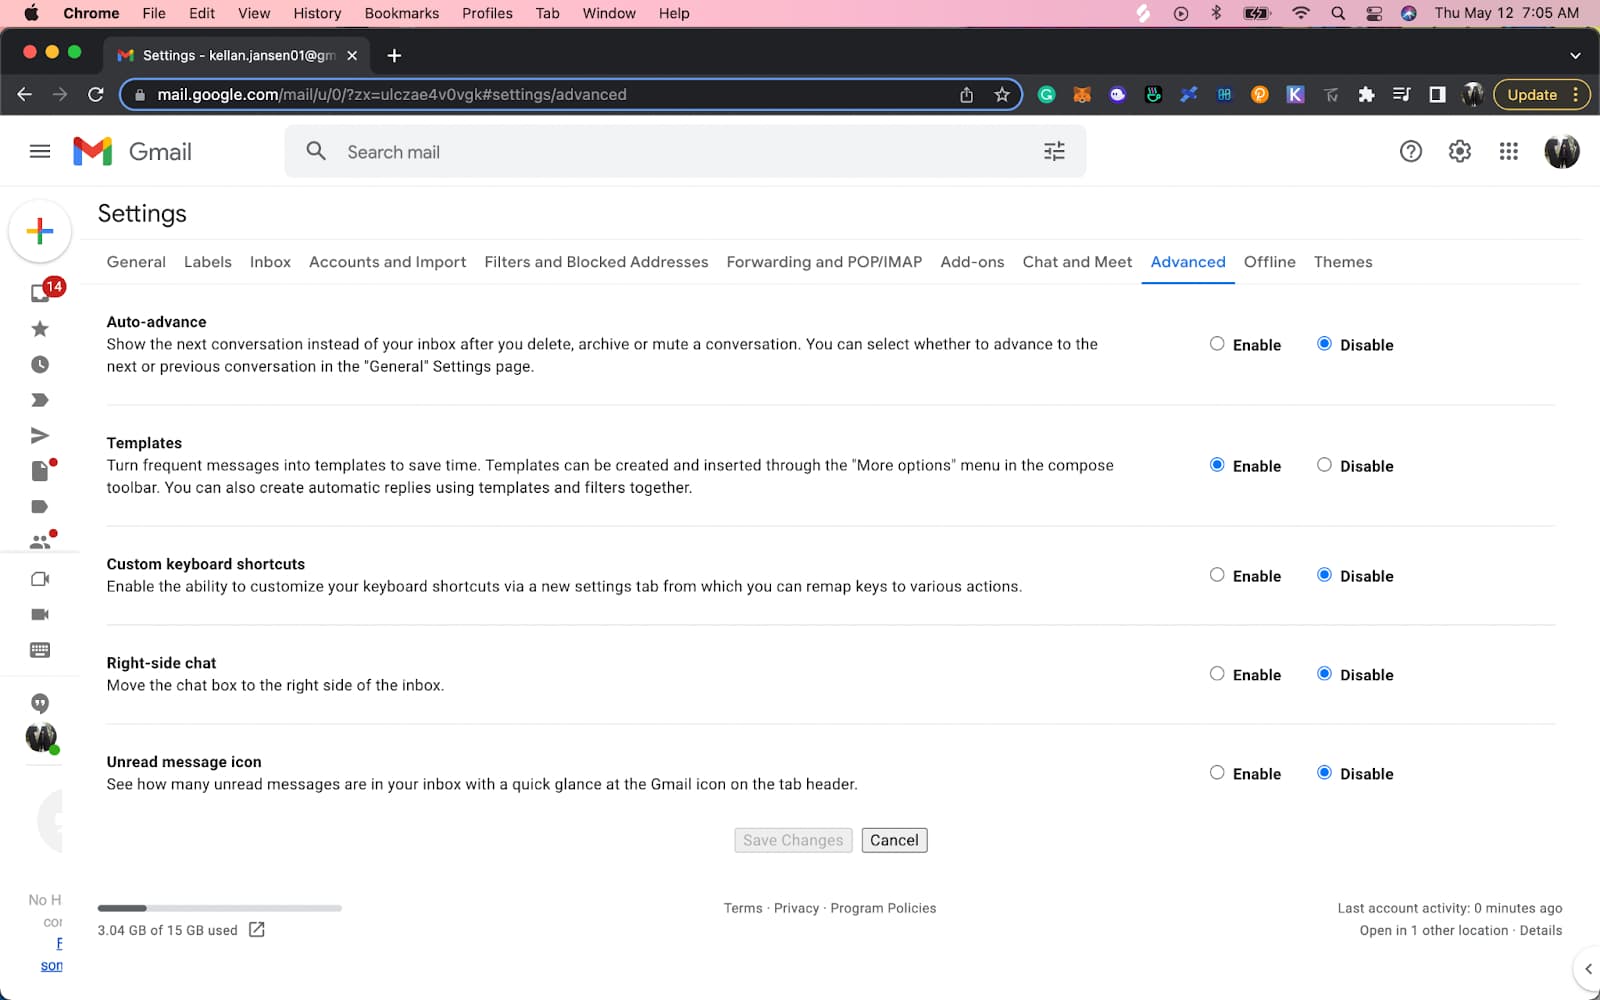
Before you can do anything, you need to ensure that you’ve given yourself the ability to create templates in your Gmail account.
You enable templates in Gmail by navigating to your settings page: click the cogwheel in the top right-hand corner of the screen, then “See all settings.”
From there, you’ll click on the tab near the top of your screen that says “Advanced.” Then, find the section that says “Templates,” click on the “Enable” button and save your changes at the bottom of the page.
If you can't find the Templates option, check that you're on a computer. Gmail templates can only be turned on and used in Gmail on a computer, not in the Gmail app on your phone.
You can see what all of this looks like on the screenshot above if you need help.
Step 2: Create your email template
Now that you’ve turned on templates in Gmail, you’re ready to begin creating your first template. For now, just create the email in the same way that you’d write any new email.
You can plug in placeholder text into the address and greeting fields since you’ll likely be altering those for each new email you send with the template.
Step 3: Add an attachment to the template via Google Drive
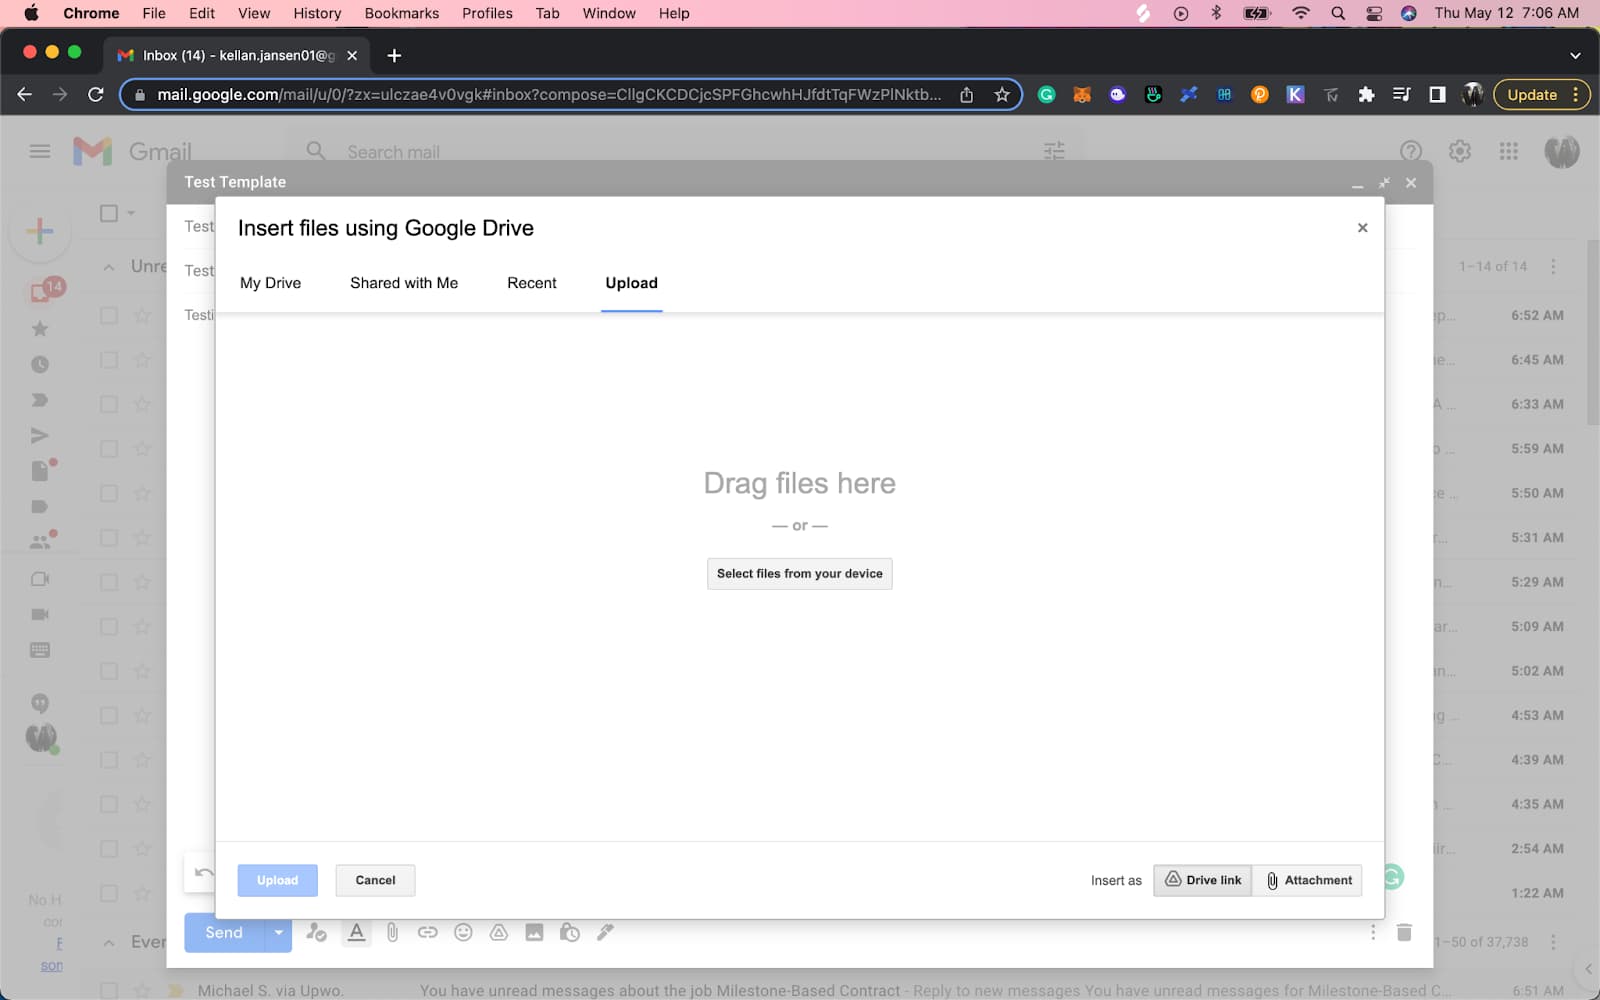
This is the main step that you need to know to create an email template in Gmail with attachments.
You can’t attach a file from your computer to an email draft and save it as a template. The Gmail attachment needs to come through Google Drive instead.
To do that, navigate to where the send button is on your email draft screen. Then, place your mouse over the icons to the right of that until you see “Insert Files Using Drive” pop up. You should see a window pop up that looks like the above screenshot when you click here.
At this point, you have two options. You can either:
- Upload a file from your computer to your Google Drive
- Choose an existing file from your drive to add as an attachment to the draft
Once you can see the attachment that you want in this window, just double-click on it. When you do, you should see a link to that file pop up in your email template.
Step 4: Save the Gmail template
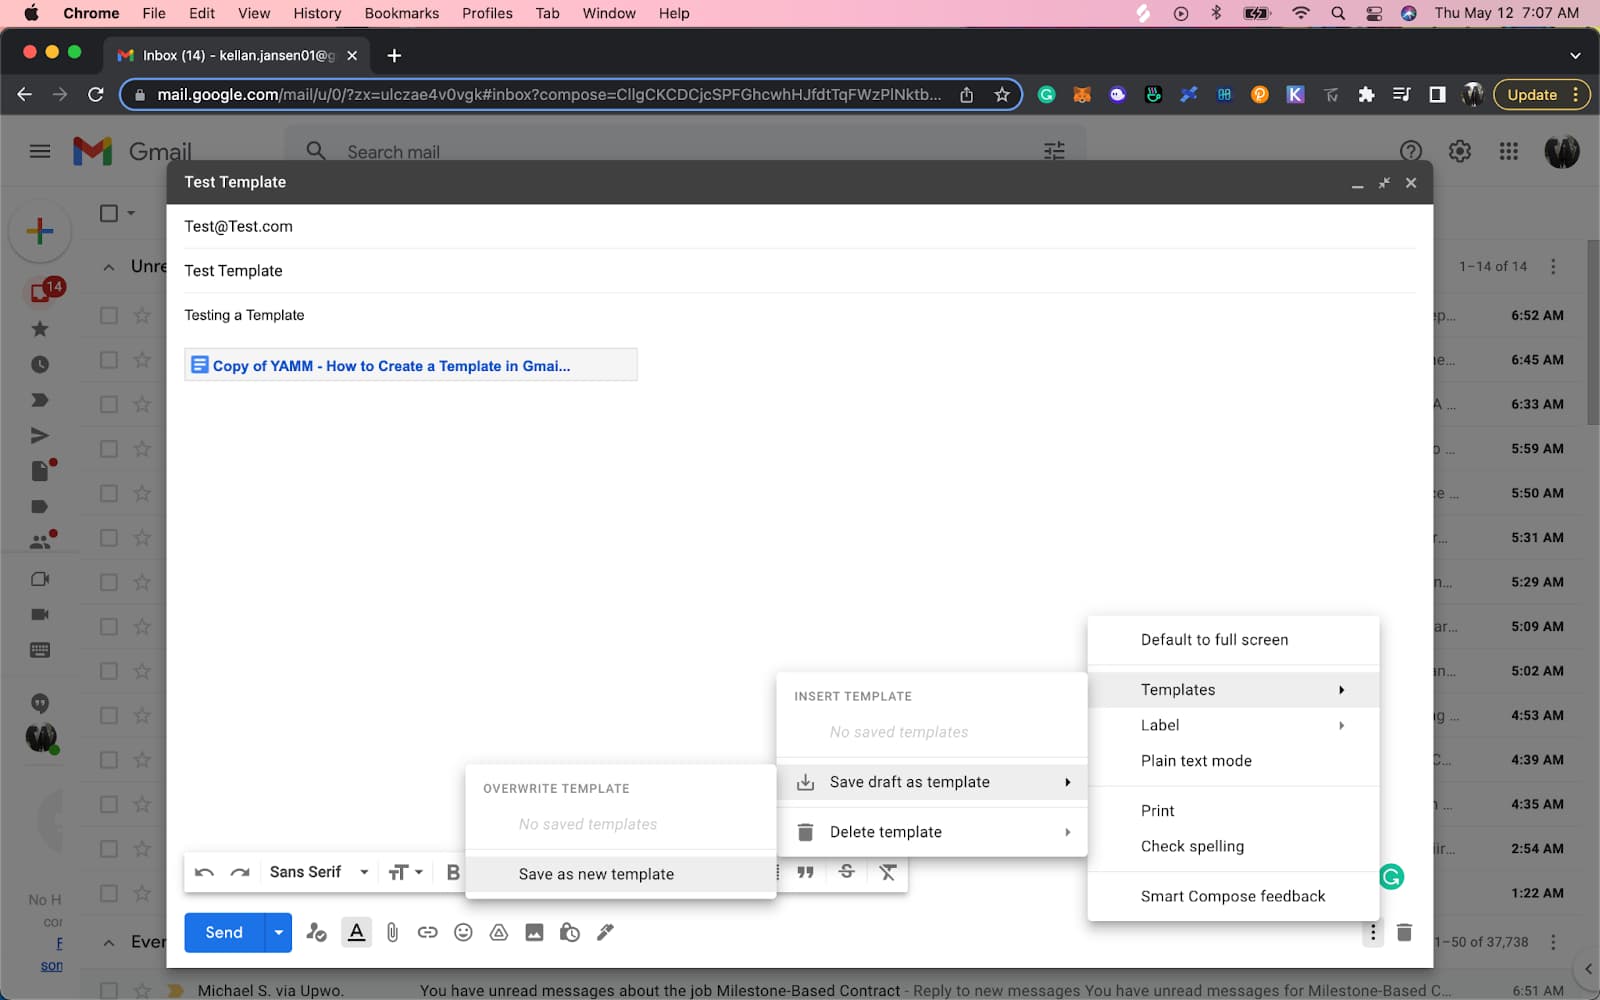
At this point, we’ve already created a template in Gmail and an attachment. Now you’ll learn how to save an email as a template so that you can go back and access it whenever you need to in the future.
Here’s how to do that:
- Click on the three dots on the right-hand corner of your email window
- Highlight the “Templates” selection
- Highlight the “Save draft as template” selection
- Click on the “Save as new template” option
- Enter a name for the template in the window that pops up
If you get stuck, you can see what all of this looks like in the screenshot above.
Step 5: Use the template to send new messages
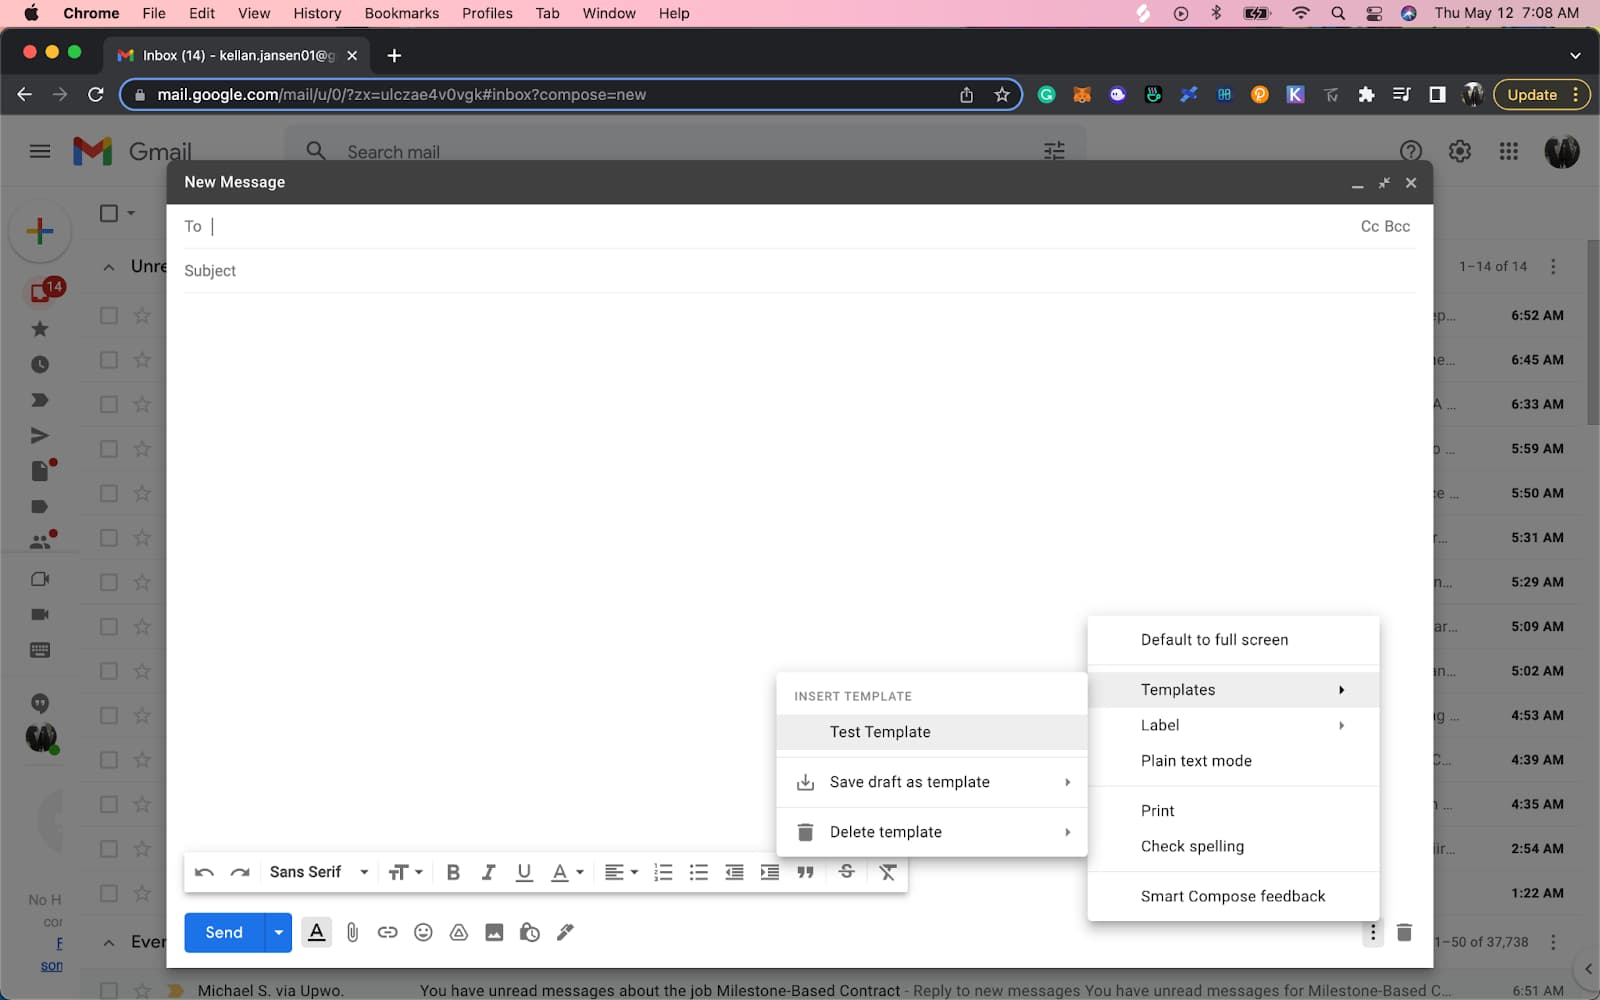
You’ve officially created a Gmail email template with an attachment. Now all that’s left to do is learn how to send email templates with attachments in Gmail.
The process for this is a smaller version of the one that you just followed. You simply:
- Click on the three dots on the right-hand corner of the email window
- Highlight the “Templates” selection
- Click on your template name in the window that pops up (ours is called “Test Template”)
When you click on the template, it’ll auto-populate the email window screen with both the text of your draft and the attachment that you linked to it from Google Drive.
Before you send, check who can open the file. A Drive link only works for people who have access to it, so share the file with your recipients, or set it to “Anyone with the link” if that's fine for what's in it.
How do I send a different attachment to each person?
A Gmail template sends the same text and the same link to everyone. When each person needs their own file, like their invoice, certificate or report card, use a mail merge instead. With YAMM, the template is a regular Gmail draft, and each person's file comes from your Google Sheet:
- Put each file in Google Drive and copy its link.
- In your sheet, add a column named Attachment and paste each person's link on their row. Several files for one person go in the same cell, separated by commas.
- Write the email as a Gmail draft. To reuse a template you saved, insert it into a new draft first.
- In your sheet, select Extensions > Yet Another Mail Merge: Mail Merge for Gmail > Start Mail Merge. Click “+ Alias, filters, personalized attachments” and tick “Attach files in column to emails sent.” Then go back, pick your draft in the Email Template dropdown and click Send emails.
YAMM attaches each person's file to their own email, and Google Docs, Sheets and Slides files go out as PDFs. Our guide to adding attachments to a mail merge has the details and the daily limits.
Limitations of email templates in Gmail
Basic Gmail templates can be nice if your email goals aren’t complicated. But when you start trying to maximize the performance of your email marketing campaigns, there can be some key limitations.
Here are three to think about:
No easy option for personalization
One problem is that there’s no good way to quickly personalize large amounts of emails with Gmail.
The only way to add personalization to your messages is to manually pull up the template and type in the details yourself. You have to do that every single time you want to send a personalized message.
That may not matter too much if you only have 10-20 messages you want to send. But it can add up to be a huge time sink if your contact lists are any larger than that.
High potential of errors occurring
Since you have to do everything manually with Gmail, it creates many unnecessary opportunities for errors.
For example, let’s say that you have to type out 50 names and you want to get through it as quickly as possible. There’s a decent chance that you’ll mess up on at least one of them.
That type of thing may seem relatively minor, but you never know how it will impact your target audience — small mistakes can make a big difference.
No integrated tracking features
Finally, Gmail also doesn’t have an integrated feature for tracking the performance of your campaigns.
If you want to see the percentage of people who open, click-through, and respond to your messages, then you have to use an add-on to do so. There’s no way around it.
Email tracking metrics are important because they help you assess performance and figure out what you can do to improve it.
Using a mail merge add-on could make more sense for your goals
If you’d like to go beyond the limitations of Gmail for email marketing, then using a mail merge tool such as YAMM could be just what you need. Here are some examples of how this type of add-on can help you get more out of your campaigns:
Faster personalization
Mail merge tools make it easier to personalize your messages by doing it for you automatically.
All that you need is a Google Sheet with all of the personalization details that you want in your emails.
Once you create that list, you can use it as many times as you want to craft different types of email marketing messages with the same personalization details.
Fewer errors
We talked in the previous section about how Gmail increases your potential for errors by forcing you to do all of your personalization manually.
Mail merge tools do the opposite. They can help you reduce errors since you only need to get the details right once, then you can allow the mail merge tool to do the rest of the work for you.
That way, you can devote a larger chunk of time to proofread your email copy while still saving time that you won’t have to devote to getting the manual personalization details right.
Easy tracking
Mail merge tools like YAMM also give you the ability to track the performance of your campaigns as well.
For example, with our add-on, you can see the percentage of your emails that bounce, are opened, and are clicked through directly in Google Sheets.
Simple segmentation
Finally, mail merge tools also help a lot with list segmentation.
With a mail merge, you create a contact list in Google Sheets, which auto-populates your emails. It’s super easy to segment these addresses with filters in Google Sheets.
That way, you can make sure that you’re always sending the right messages to the people who they’re going to have the greatest impact on.
Get more out of your Gmail templates with YAMM
YAMM is an intuitive mail merge add-on that helps you get more out of your email marketing campaigns.
With YAMM email templates, you can:
- Easily personalize large quantities of emails
- Track the performance of your results in Google Sheets
- Reduce your potential for error
- Quickly segment your lists
Try YAMM on your next email to a list.