
A cluttered inbox can be extremely frustrating. You know you have important emails buried somewhere in there, but the thought of wading through months or even years' worth of messages is enough to make anyone want to tear their hair out.
If your Gmail account has become a digital dumpster, don't despair! There are ways to get it organized and keep it that way.
With a little bit of effort, you can transform your unruly inbox into a lean, mean, email-sorting machine.
How to organize new emails efficiently without cluttering your inbox
Change up your Gmail design
First up, let’s look at how we can make our Gmail layout more efficient. Click the gear icon to open up Settings.
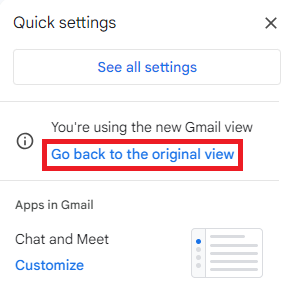
Do you miss the old Gmail? The classic view in Gmail is more efficient, and it’s easy to change it back. Under Quick Settings, click “Go back to the original view.”
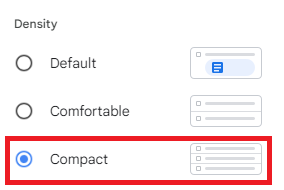
If you want to see more emails at one time, you can change the Density to “Compact.”
You can also change your inbox type. There are multiple options to choose from, but we’d suggest using “Unread first.”
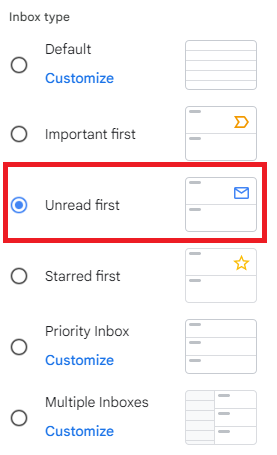
New emails will be at the top of your inbox, where you can then decide what you’d like to do with them. By doing this, you can gear your inbox to be more efficient and organized.
Change icons to text
Another design change to make your Gmail more efficient is to change the icons to text. You’ll never need to worry about choosing the right icon, meaning you can save a lot of time you spend scanning the toolbar.
To do this, click “Settings” and “See all settings.” Go to the General tab and scroll down to “Button labels.” Change the option from “Icons” to “Text.”
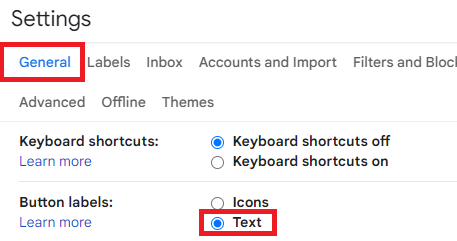
Now, options will show up as text labels rather than icons. It should look like this:

Archive conversations you don’t need anymore
When you receive an email, it’s important that you decide what to do with it immediately to keep your inbox organized. When you no longer need an email in your inbox but don’t want to delete it outright (most of the time), that’s when you should archive it. Archiving is the crux of organizing your inbox.
When you receive an email, you can choose to:
- Ignore it by archiving without opening it
- Read, reply, forward, and/or snooze it, then archive it
Both help you remove processed emails from your inbox immediately.
You can archive an email by selecting it and clicking on “Archive,” the first option available.
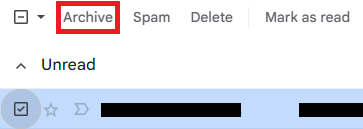
These emails will now be stored in the Archive folder. Archived emails will still show up if you search for them, but they’ll no longer clutter up your inbox. Once you’ve processed an email, you should always archive it.
Learn how to unarchive Gmail emails here.
Snooze emails you want to respond to later
If there are emails that you don’t want to respond to at the moment and want to remove from your inbox temporarily, you should snooze them! When you snooze an email, it will appear in your inbox later at a designated time.
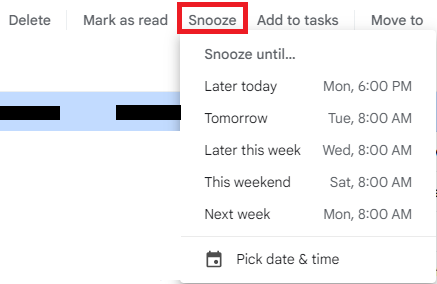
To snooze an email, select it and click “Snooze.” When you do so, you’ll be able to pick a time. The default options are tomorrow, this weekend, or next week. You can also choose a custom date and time.
Create filters
Another great way to organize your inbox is by creating filters. Filters allow you to automatically label, star, delete, or forward certain messages as they come in without you having to lift a finger. For example, you could have emails from a certain address automatically forwarded to another.
This is really useful for emails like notifications from other applications or promotional emails from a certain company.
To create a filter, find the icon that looks like a series of switches on the right of your search bar. Click it and a window will pop up with a set of criteria. You can filter emails from certain addresses or that include certain subjects and keywords. You can also set a timeframe for when these messages appeared.
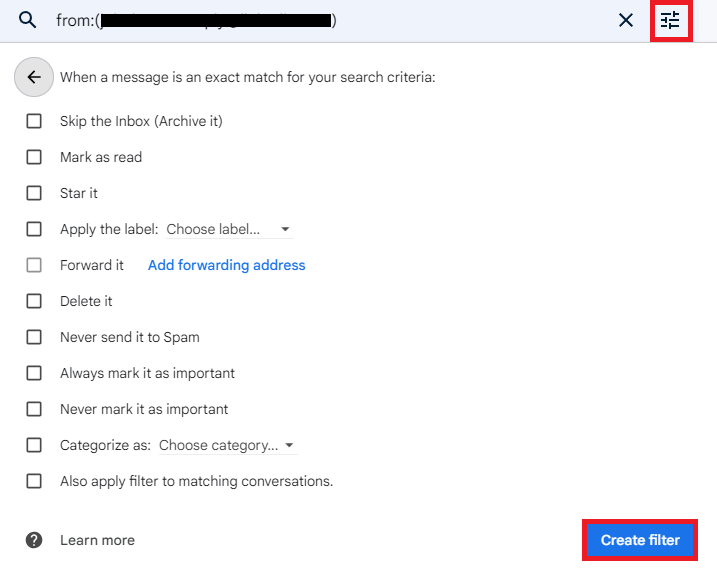
Once you've entered your criteria, click "Create filter" at the bottom of the pop-up window. From there, select which actions you would like taken when an email matching your filter criteria arrives in your inbox. When you’re done, hit "Create filter."
How to organize emails to retrieve them easily later
Star important emails
For the most important emails that you need to find the easiest, star them! This is a great way to easily retrieve an email without having to search. For example, this can help if you need to access tickets for an event or travel.
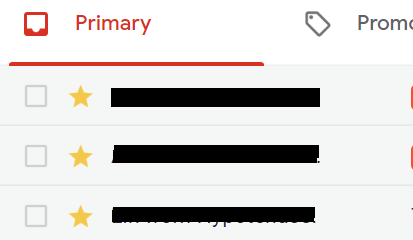
To star an email, click the empty star icon next to it. When a message has been starred, the star will turn yellow, making it easier to find. You can also find all these emails in one place by going to the “Starred” folder in the left sidebar.
Remember to unstar an email once it’s not needed anymore.
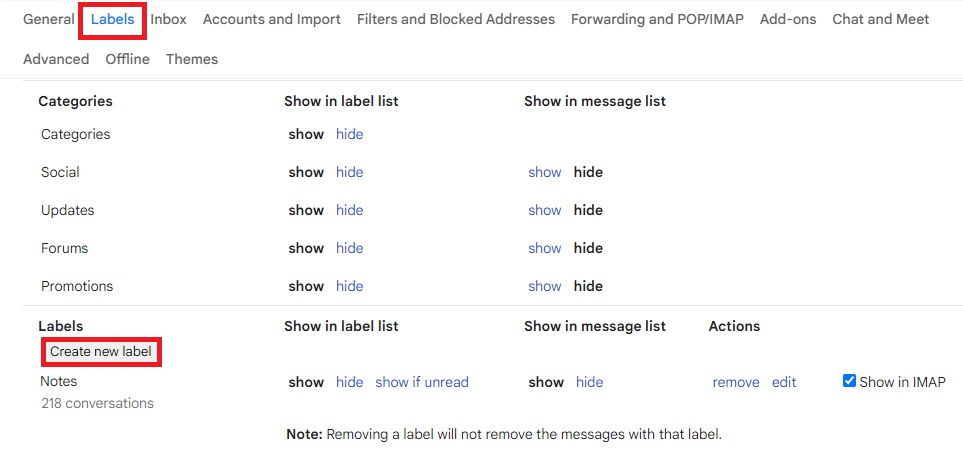
Create labels to categorize emails
Finally, another great way to organize your Gmail is by creating labels. Labels essentially act as folders; they allow you to categorize your emails so that you can easily find what you're looking for later on. However, the awesome thing about labels is you can apply multiple labels to an individual email. These labels will appear in the left panel, and you can also search for them.
To create a label, go to Settings and go to the “Labels” tab. Scroll to the “Labels” section and click the button that says “Create new label.”
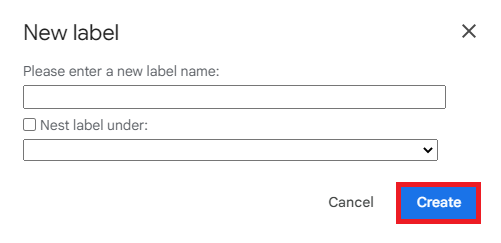
When you do, a window will pop up. It will ask you to enter the name of the label. You can also “nest” it under another label (this is like a sub-folder). Once you’re finished, click “Create.”
There are many different ways that you can choose to label your emails. One way is by the sender. You could create a label for friends, family, work, school, etc. Another way to label your emails is by type of email. You could create labels for things like bills, receipts, RSVPs, etc. You could even label your emails by the project.
To apply labels to emails, select the email(s) you want to label and click the "Labels" option in the toolbar. Then, select the labels you want to apply and click "Apply."
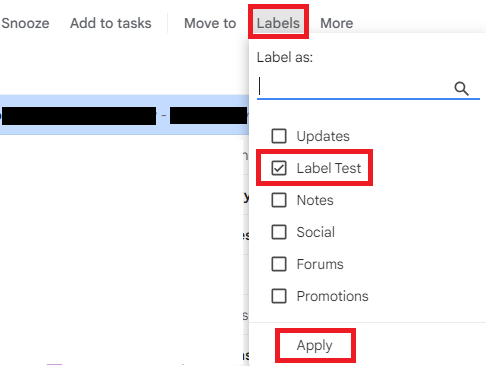
Figure out a process for organizing your Gmail
Once you’ve configured your inbox, you need to be able to keep it organized. It’s simple to create a process that you can stick to once you’ve leveraged the tools at your disposal.
When you receive a new email, figure out what you want to do with it. You can choose to leave it unread or you can read it to send it to your other inbox. Once you’ve read it, you can reply to it and archive it immediately. You can also leave it read to process later or snooze it to reply another time.
If it’s an email you need to reference quickly, star it. If it’s an email of a certain type, send it to a specific label. When you take the time to act on an email immediately rather than letting it sit there, you prevent your inbox from bulking up too much.
We hope this article has shown you the many ways you can organize your inbox. With a little bit of effort, you can keep your inbox clear of old emails and have a process to organize new emails as they come in.