

Forwarding an email in Gmail is very convenient when you want to send an email you’ve received to someone else. There are many reasons why you might want to forward your Gmail messages:
- If you’re in an organization, forwarding is a great way to circulate information to different groups of people.
- If your favorite company sent out a great promotion, you could forward it to your friends.
- If you want to forward all emails from one of your accounts to another, you can auto-forward all incoming messages there
No matter the reason, forwarding emails on Gmail is a simple process that can be done in a few clicks. Gmail offers two different ways to forward your emails: manually and automatically. We’ll take a look at both methods so you can learn how to forward emails in Gmail.
How to forward an email on Gmail manually
If you’re looking to forward Gmail messages individually to one or a few people, manually forwarding the email is the way to go.
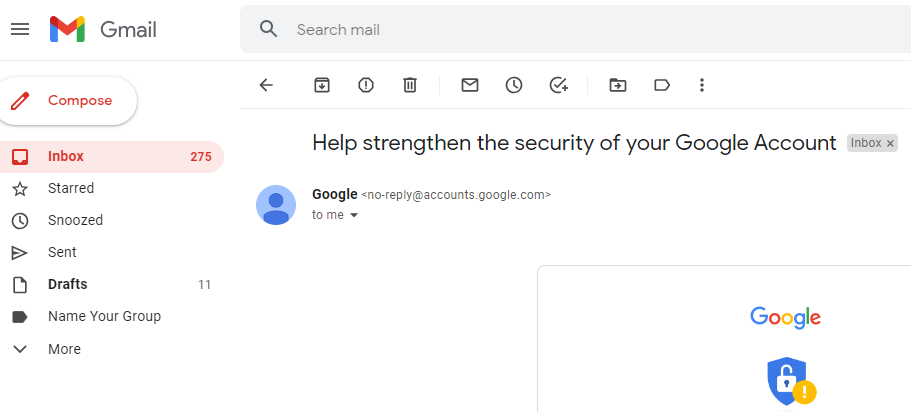
Step 1: Open the email you want to forward
The first step is finding the email in your Gmail inbox that you want to forward. If you’re having trouble finding it among the many emails you receive, use the search bar at the top.
Once you’ve found the email, open it up.
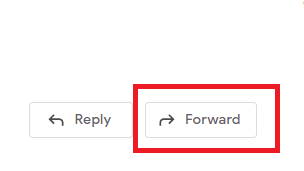
Step 2: Click on the “Forward” button to forward your email
Once the email is open, look for the "Forward" button in the bottom right-hand corner of the message. It should be an arrow pointing to the right (“Reply” points to the left). Click on it.
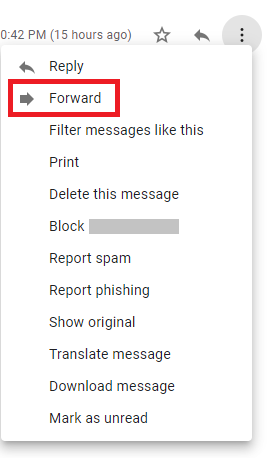
If the email is long and you don’t want to scroll, you can go to the three dots at the top right of the email. Click on them and you should see a “Forward” option.
Step 3: Choose an email address and forward your message
A new window will pop up. In the "To" field, type in the email address of the person you want to send the message to.
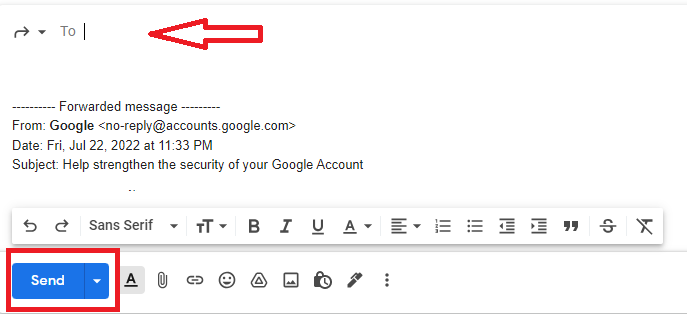
Above the forwarded message, you can write a message to the address you’re forwarding to. This message may provide them context for why you’re forwarding the email to them.
When you're finished, click the "Send" button.
That's it! You've successfully forwarded an email message in Gmail manually. Let's take a look at how to set up automatic forwarding.
Accidentally sent an email? Learn how to retract an email in Gmail here
How to Forward Emails Automatically in Gmail
Can you forward emails from Gmail to a new email address automatically? Yes, you can with the Gmail forwarding feature. If you want your emails automatically forwarded to a different address, you can set up mail forwarding on Gmail. Let’s see how to set up auto forwarding in Gmail.
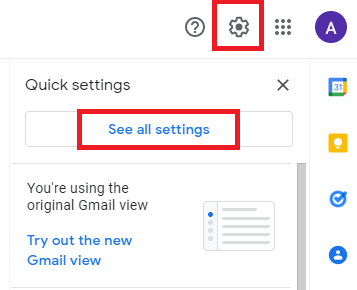
Step 1: Go to Settings in Gmail to set up forwarding
The first step is to go to Settings. To do this, click on the gear icon in the top right corner of your Gmail page. This will open up a drop-down menu with a bunch of different options.
One of these options is "See all settings.” Click on this. It'll take you to a new page with all of your Gmail settings.
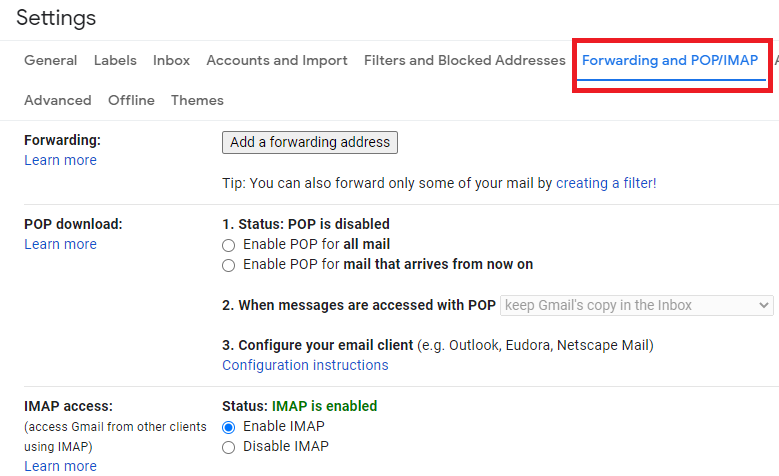
Step 2: Go to Gmail Forwarding and POP/IMAP Settings
On this new page, find the "Forwarding and POP/IMAP" tab, which should be after the “Filters and Blocked Addresses” tab. Once you click on this, a new section will open up with your forwarding options.
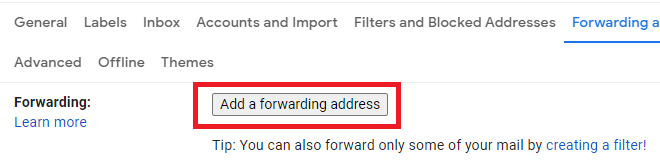
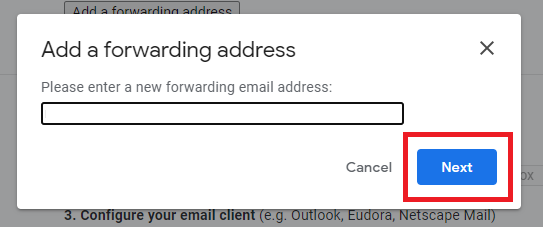
Step 3: Choose a forward address and send
In the "Forwarding" section, click on the "Add a forwarding address" button. This will open up a popup window where you can add the email address you want your Gmail emails to be forwarded to. Then click on ‘’Next’’ > ‘’Proceed’’ > ‘’OK’.”
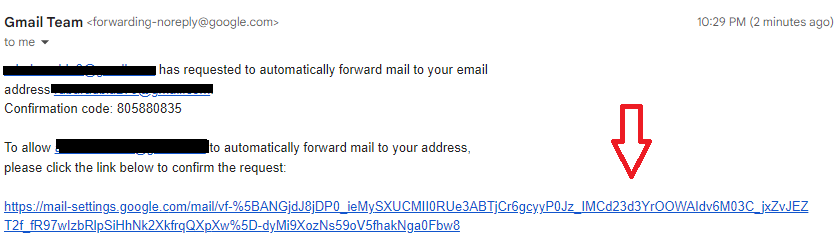
Step 4: Confirm verification link
After you've added the forwarding address, Gmail will send a verification link to that address. You’ll need to log in and click on this link to confirm that you want your Gmail emails forwarded there.
Step 5: Refresh your browser
After you've confirmed the verification link, go back to your original email and the settings page. You may need to refresh your browser before the changes take effect.
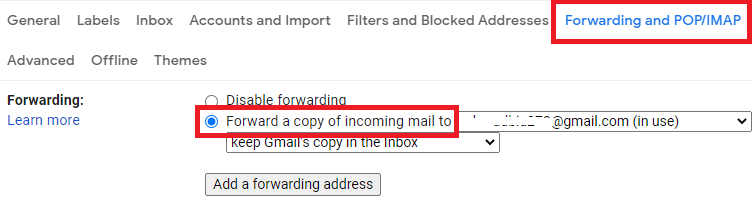
Step 6: Enable Gmail email forwarding
Once you're back on the settings page, find the "Forwarding and POP/IMAP" tab again and click on it. In the "Forwarding" section, select ''Forward a copy of incoming mail to'' and the email address you want your Gmail emails forwarded to.
You can also choose what will happen to the emails after they're forwarded. There are four options:
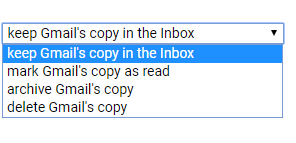
- Keep Gmail's copy in the Inbox (recommended): This will keep a copy of every email that's forwarded to your Gmail inbox. This way, even if you accidentally delete an email from your forwarding address, you'll still have a copy in Gmail.
- Archive Gmail's copy: This will archive the email in Gmail after it's been forwarded. This means that it'll still be in your Gmail account, but will be moved out of your inbox.
- Mark Gmail's copy as read: This will mark the email as read in Gmail after it's been forwarded.
- Delete Gmail's copy: This will delete the email from Gmail after it's been forwarded.
Getting some time off? Learn how to set out of office in Gmail
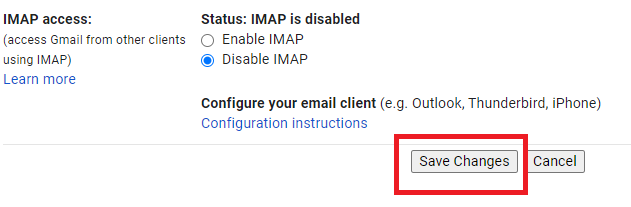
Step 7: Save Changes
After you've chosen what you want to happen with the forwarded emails, scroll to the bottom of the page and click on the "Save Changes" button. This will save your forwarding settings and start forwarding all new emails to your chosen address.
That's it! You've now learned how to set up an automatic email forwarding rule in Gmail.
However, there are a few things to keep in mind with automatic forwarding.
First, you can only forward emails to one email address at a time.
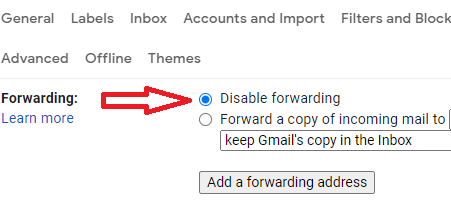
Second, you can disable email forwarding at any time by going back into your settings and checking the "Disable Forwarding" box and saving.
Third, if you want to forward certain emails only (e.g., emails with a certain subject line), then you'll need to set up filters. This is a bit more complex and is outside the scope of this article, but you can learn more about it in our article on creating rules in Gmail.
How to auto-forward to multiple emails in Gmail
What if you wanted to automatically forward emails to multiple accounts? Unfortunately, you can’t set up a filter to forward all emails to different accounts, but you can set up filters to send certain kinds of messages to certain email addresses. Let’s take a look at how to do that.
Step 1: Open your search options
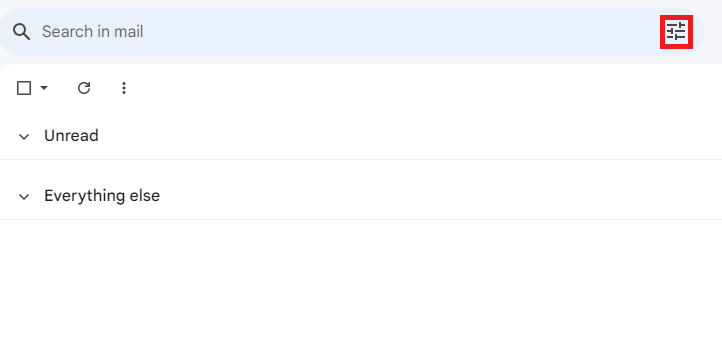
The first thing you’ll want to do is open up your search options. That’s the filter icon to the right of your search bar at the top of the Gmail inbox.
Step 2: Enter your search criteria

Clicking the search options opens up this window, where you can enter criteria for your search. As you can see, there are many options to choose from when creating rules. Maybe you want emails from a certain account forwarded to another. Maybe you want emails with attachments sent to another.
Whatever the case, you can enter the criteria for your filter. When you’re finished, click “Create filter” instead of “Search.”
Step 3: Create your filter
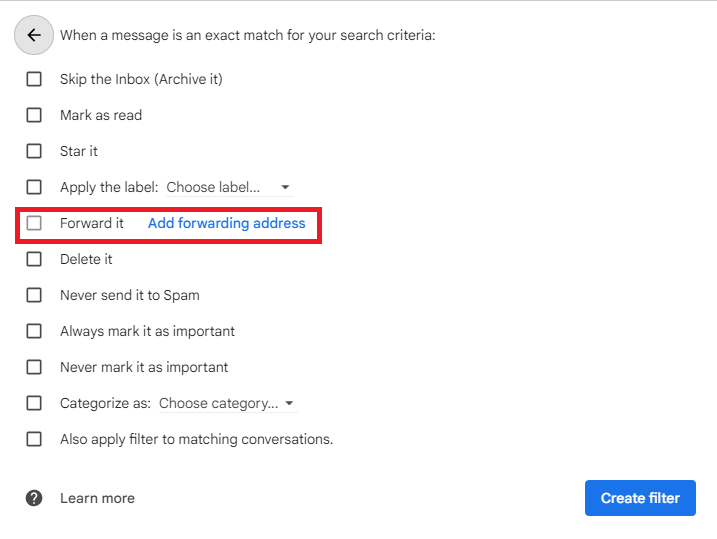
Now, this window will pop up, where you decide what will be done with the email. You’ll want to find “Forward it,” but you’ll have to add a forwarding address before you can click it. If you already completed the automatic forwarding, it will forward there. Otherwise, you’ll be taken to the forwarding settings again.
Once that’s done, you can select “Forward it” and hit “Create filter.” You’re done!
How to send all Gmail emails to another account
Alright, you now know how to forward emails manually and automatically. What if you wanted to forward all your emails from one Gmail account to another? In essence, you would be trying to switch accounts, including contacts, which is something you can do in Gmail! Just follow these steps.
Step 1: Open your Gmail Settings
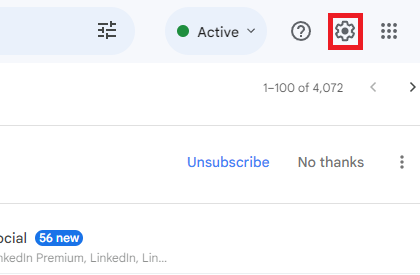
The first thing you’ll need to do is click the gear icon in the top right corner of your Gmail inbox. This will open your Quick Settings, and you should select “See all settings.”
Step 2: Go to “Accounts and Import” tab
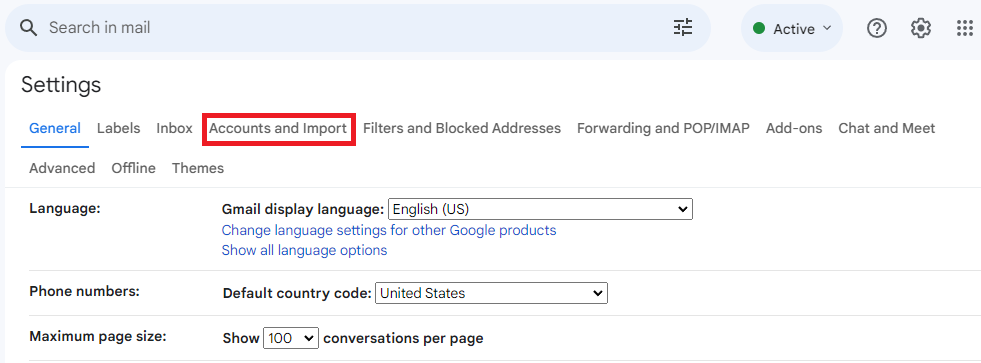
When you open your settings, you should move over to the Accounts and Import tab. It should be the fourth option at the top.
Step 3: Import your mail and contacts
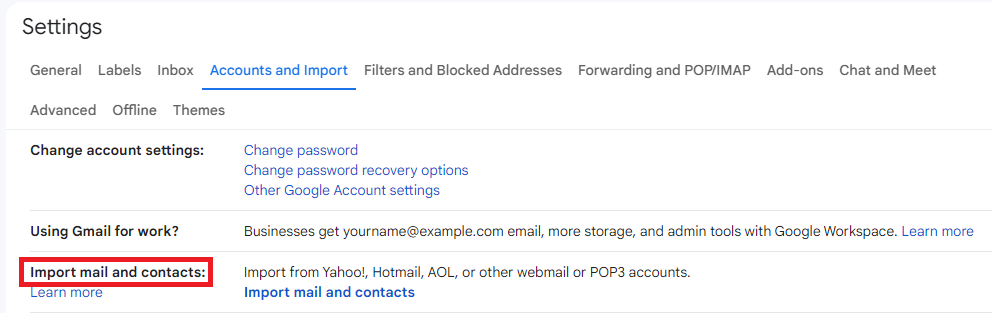
Scroll down and find the “Import mail and contacts” option, then select the blue text that says the same. As you can see, besides another Gmail account, you can import from Yahoo, Hotmail, AOL, and other webmail and POP3 accounts.

This window will pop up, and you’ll want to enter your old email address, the one you’re looking to import emails from. Once done, hit “Continue.”

Next, you’ll have to sign into that old account so Google can verify you own it. Click “Continue” and follow the prompts. Once through, click “Agree.”
The next window will show checkboxes next to the following options:
- Import contacts
- Import mail
- Import new mail for next 30 days
Check all the boxes that you wish, and when you’re done, click “Start import.” And that’s it! Your contacts and mail will start to transfer to the new account. It’s not going to happen immediately, but you should be set in a bit. Make sure to let folks know about this change to avoid confusion!
Get more out of your Gmail account with YAMM
There you have it! You now know how to forward emails on Gmail both manually and automatically. If you send out mass emails, you may use an alias or reply-to address for replies. However, replies will not arrive at the address where the mail merge was sent. With YAMM, this is easy to configure and involves the same settings for automatic forwarding!
YAMM is a mail merge that allows you to manage your email lists and send out personalized messages to recipients. With YAMM, you can schedule when your mail merge is sent out and track results in real-time. Plus, YAMM integrates seamlessly with Google Workplace!
Install YAMM today and start sending powerful messages to more people than ever before!