
Writing emails is a core function of work, though if you’ve ever found yourself writing the same email twice, you should create email templates in Gmail. This is one of the many Gmail features geared toward helping you save precious time so that you can focus on what’s most important for your business.
What’s even better is that once you learn how to create email templates in Gmail, you can edit and update them for each new campaign. In this tutorial, we’re going to show you how to edit a template in Gmail in a few simple steps.
How to edit templates in Gmail in a few steps
Step 1: Compose a new email in Gmail
An important thing to know before you start editing email templates in Gmail is that you can only access them on the browser, not the mobile app. In your browser, open Gmail. If you’re not automatically logged into your account, sign in using your email address and password.

Once you are on your Gmail inbox page, click the “Compose” button on the left. This will open a new message window in the bottom left of your inbox page.
Step 2: Open up your email template in Gmail

A lot of users ask where to find templates in Gmail because they’re nested within another menu. To open up your Gmail templates, click the “More options” button at the bottom (it looks like three vertical dots). Find the “Templates” option; under the ‘insert template’ you will find your saved templates. Insert the template that you want to edit by clicking on it.
It’s important to note that you must have a template that has been saved previously to show up under the Insert template option. Also, the Gmail templates feature itself has to be enabled before even making a template from the settings tab. If you want to learn how to create and save a template, you can go to this tutorial.
If you don’t have a template saved already and click the More Options button, the pop-up menu will show up empty like this:

Step 3: Make any adjustments to the template you want
Once you have pulled up the template that you want to edit, it’s time to make the edits. Update anything that you want consistent for all your recipients such as the venue of a meeting, time of a meeting, address, etc. Don’t worry about personalization for now!
If you are just editing an email template in Gmail and saving it, you can move on to the next step. However, if you are using the template in conjunction with a mail merge app like YAMM, there is just one more step involved.
With a mail merge, you can have data entered from your contact list directly into the email. This means that you can add specific names and personal details that fit the recipient. You’ll need to put markers in curly brackets (e.g. {{First Name}}). With YAMM, all you need is a Google Sheet contact list! For a full tutorial on how to send out mass emails in a click like a pro, check out this tutorial.
Another thing to take note of at this point is whether or not you have the signature feature enabled in your Gmail settings. If you do and you also accidentally insert the signature while editing your template, the resultant sent email will have two signatures inserted in it instead of one. Just something small to be careful about!
Step 4: Save the updated email template in Gmail
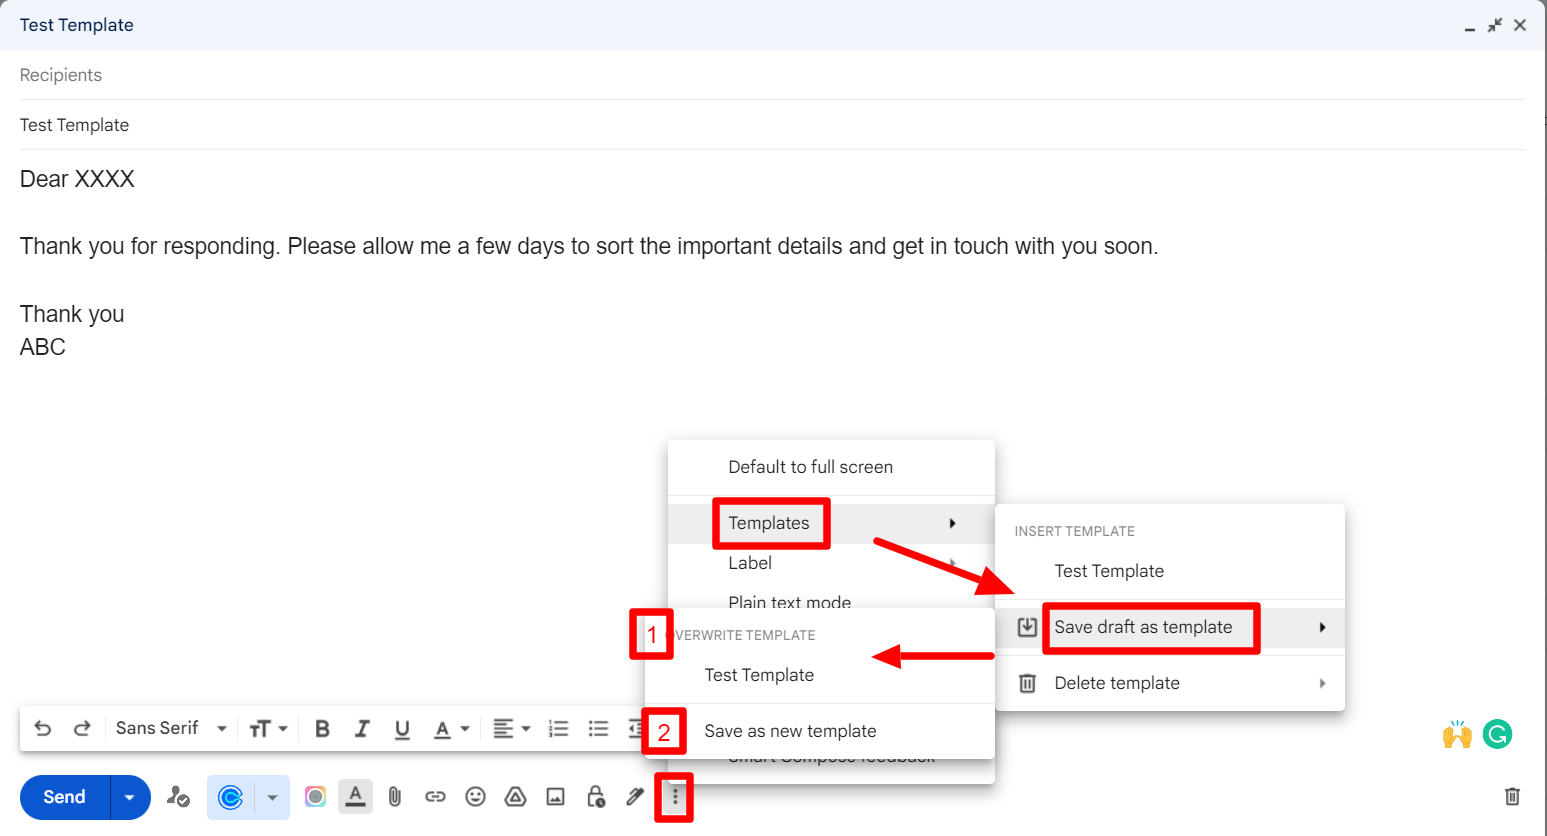
Now that you have your template edited, it’s time to save it so that you can pull it up later with ease. To do this, click the More Options button at the bottom again. Click Templates in the pop-up menu that appears and click “Save draft as template.”
This will open up two options in another menu. The first one will overwrite the already saved template with the changes that you just made. To choose this simply click the name of the template that you want to overwrite and you’re done.
The second option is to save the changes you just made in the form of a new template. To choose this option click “Save as a new template” and name it.
Advantages of using email templates in Gmail
Reduces time and room for error in email sending
The main draw of the template feature lies in the fact that you don’t have to type in the same text repeatedly. Having a saved template that can be pulled up and edited seconds before sending frees up a lot of time and makes emailing very time efficient.
Not having to type repeatedly also reduces the margin for error while sending emails. For maximizing productivity and efficiency you can even choose to have many different types of templates created and saved so that they are on hand when you need them in a hurry.
Just keep in mind that you can only have 50 templates at a time, so you should figure out templates you can use for multiple purposes.
Makes it easier to send out mass emails
There’s no doubt that the Gmail template feature makes everyday work easier. However, the feature shines through when you pair it with a good mail merge app like YAMM to send out mass personalized emails.
Personalized emails can make a world of difference in the email marketing campaign of an online business. They have better delivery and open rates, which directly impacts a business's success.
By learning how to create, save and edit a template in Gmail you have already set yourself up for efficiency and ease while working with Gmail. If you send out mass emails for your business and would like to streamline the personalization process, you can get started with YAMM.
YAMM works perfectly with Gmail templates
There you have it! Editing a template in Gmail is easily achieved in a few simple steps. All you have to do is pull up the desired template in a new message tab, make the required edits, and save it either as a new template or overwrite the one already saved.
With YAMM, it takes seconds to make important personalizations before mass sending your email right from your Google spreadsheets. And guess what? You can track the status of your email from there, too. Try out YAMM for free today!