

There are a lot of reasons you might want to select all emails in Gmail. Maybe you're trying to clean out your inbox, or you need to export your emails for archiving. Whatever the reason, it's easy to do if you know how to select all emails in Gmail!
In this article, we'll show you how to select all in Gmail step by step. We'll also show you how to select all messages in Gmail by status (like unread or starred), which can be helpful if you're trying to focus on a particular type of email.
Let's get started!
How to select all mail in Gmail
Step 1: Go to Gmail
If you want to select all mail in Gmail, you need to open it in your web browser first. You can do this by going to Gmail and logging in with your email address and password. However, keep in mind that you can only select all your emails in the desktop version of Gmail. If you want to know how to see all mails in Gmail on mobile, whether Android or iPhone, be aware that Google’s mobile app doesn't have this feature.

Once you are logged in, select the folder in which you want to select all the emails. For example, if you want to select all the emails in your Inbox, click on the "Inbox" tab.
Step 2: Click the "Select All" Gmail checkbox
Once you are in the correct folder, look for the row of options at the top of the page. One of the options should be a checkbox - this is the Gmail "Select All" checkbox. Click on the checkbox to select all the emails in that folder. All the emails should now have a checkmark next to them.

However, keep in mind that this only selects the emails on the current page. Usually, 50-100 emails are shown on each page, so if you have more than that, you'll need to repeat this process for each page.
Step 3: Select all messages in Gmail
If you want to select all the emails in your inbox, regardless of whether they are on the current page or not, click on the "Select all [x] conversations in inbox" option at the top of the page. X represents the number of conversations in that folder.

This will select all mail in the Gmail folder, even if they are spread out over multiple pages.
Step 4: Choose what you'd like to do with them
Once you've selected all the emails you want, it's time to choose what to do with them. The options will depend on which folder you're in.
For example, if you're in the Inbox, the following options are available in the toolbar:
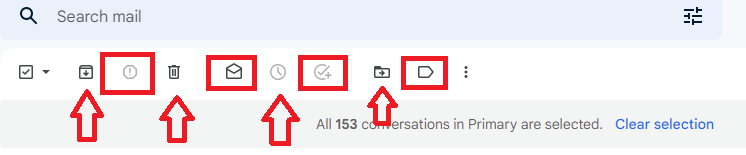
- Archive: This will move the selected emails out of your Inbox and into the All Mail folder. This is helpful if you're trying to clean out your Inbox but don't want to delete the emails entirely.
- Report Spam: This will move the selected emails into the Spam folder and mark them as spam. This is helpful if you're getting a lot of junk mail.
- Trash: This will move the selected emails into the Trash folder. These emails will be deleted after 30 days, so if you want to delete them immediately, you'll need to empty the Trash folder.
- Mark as read: This will mark the selected emails as read. This is helpful if you want to clear out your Inbox but don't want to delete the emails.
- Snooze: This will temporarily move the selected emails out of your Inbox until the specified time. This is helpful if you're trying to focus on other emails but don't want to delete the selected emails.
- Add to tasks: This will add the selected emails to your tasks list. This is helpful if you need to reply to emails but don't have time right now.
- Move to: If you want to move the selected emails to a different folder, click on this option and select the folder you want to move them to.
- Labels: You can use labels to organize your emails. If you want to add a label to the selected emails, click on this option and select the label you want to add. For example, you could add a "Work" label to emails related to work.
These are just some of the options available; depending on which folder you're in, there may be different options available.
That's it! Now you know how to select all the emails in a Gmail folder and what to do with them. Let's move on to selecting all messages in Gmail by status.
How to select all in Gmail by a certain status
Step 1: Go to Gmail
First, you'll need to log into your Gmail account and go to the main inbox page.

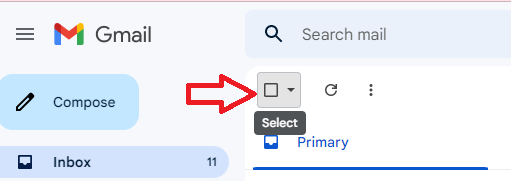
Step 2: Click the Gmail "Select all" box dropdown
Once you're on the main inbox page, look for the "Select All" Gmail dropdown box. This is located in the top left corner of the page, next to the ‘’Compose’’ label. Click on the dropdown box and you'll see a list of options.
Step 3: Choose a status to select
The options in the "Select" dropdown box will allow you to select all the emails by a certain status. The following options are available:
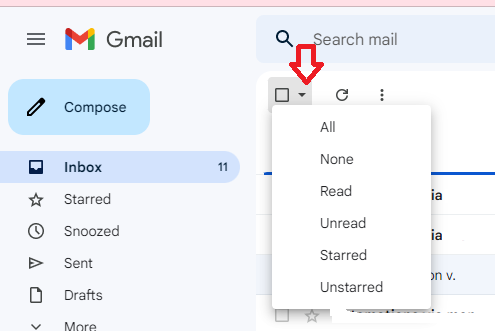
- All: This will select all the emails in your inbox, regardless of their status.
- Unread: This will select all the emails that are not read.
- Read: This will select all the emails that are read.
- Starred: This will select all the emails that are starred (i.e. marked important).
- Unstarred: This will select all the emails that are not starred.
- None: This will deselect all the emails.
Step 4: Choose what you’d like to do with them
Once you've selected all the emails you want, it's time to choose what to do with them. The options will depend on which status you've selected. Generally, you can delete, archive, mark as read/unread, or move to a different folder.

So, that's how to select all the emails in a Gmail folder and how to select all the emails by status. Now you can manage your inbox more effectively!
Work smarter with bulk actions to organize your inbox!
With these steps, you can quickly and easily select all emails in your Gmail inbox! You can use this method to delete all emails, mark all as read, or even move them to a different folder.
Bulk actions are a great way to save time when dealing with a large number of emails. So the next time you're feeling overwhelmed by your inbox, remember this handy tip!