

Are you tired of wading through your Gmail inbox, trying to find emails from a particular sender? If so, you're not alone. If you’re wondering how to sort emails in Gmail inbox by sender then this guide will show you the process to do it manually and automatically with filters.
In Gmail, you’re able to search for a sender and have their emails pulled up in your inbox. This article will explain how to pull up emails from a sender and sort them both manually and automatically with filters.
How to organize Gmail by sender manually
Step 1: Go to your Gmail inbox
If you want to sort emails in Gmail, the first step is to open your inbox. You can do this by going to Gmail and signing in with your username and password.

Step 2: Locate an email from the sender
Next, you'll need to find an email from the sender whose emails you want to group together. If there's none immediately available in the inbox, go to the search bar and type in their email address/name and find one. If you can't remember the name or address of the individual, but know what a past conversation was about, you can use the advanced search option to look for keywords.
To do this, click on the ''Show search options'' button in the search bar and it’ll open a new pop-up window where you can fill out the various fields.

In "Has the words" you can type in keywords, and in "From" you can enter the sender's name or address. When you're finished, click ''Search'' and Gmail will bring up all relevant emails.
Step 3: Find emails from the sender
Once you've found an email from the sender, right-click on the email and it'll open up a drop-down menu. From here, click on “Find emails from [sender name].” You'll see a list of every email you've received from that sender, even ones you've archived.

From here, you can decide what to do with each email. When you select an email(s), a top menu bar will pop up with different options. On the left, you can decide to archive, delete, or even report it as spam. On the right, there are options to move emails to a particular folder or label them.

For example, if you want to delete all of the emails, select all of them and click on the ''Trash'' icon that appears. All of the emails from that sender will then be moved to the Trash folder.
So, that shows you how to sort your Gmail inbox by sender manually. But what if you want to organize your Gmail by sender automatically? That’s when you should use filters.
How to sort emails by sender in Gmail automatically with filters
Step 1: Go to Gmail inbox
Even when you’re looking to automatically sort your Gmail inbox, the first step remains the same. Open up your Gmail inbox by going to Gmail and signing in with your username and password.
Step 2: Enter criteria in the advanced search
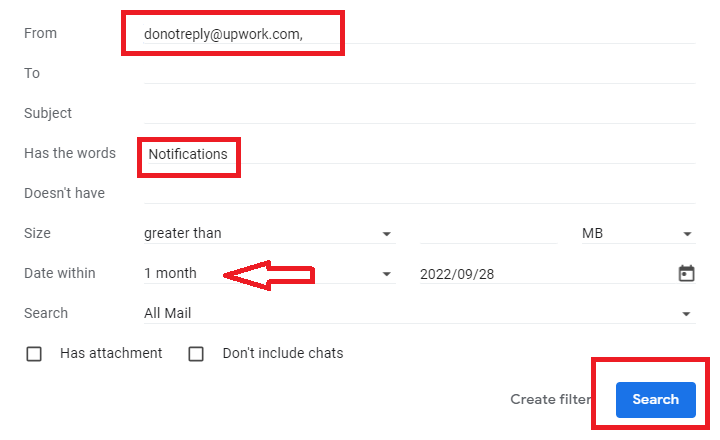
Next, you need to open up the advanced search again. This is where you’re going to enter the criteria for your filter. In the “From” field, enter the sender’s address. As for the other fields, that is up to you. You could leave them blank and just sort all emails from the sender. You could also enter keywords in “Has the words,” size requirements, or a date range.

Step 3: Create a filter for the sender
When you're finished, click on the "Create filter" button at the bottom of the drop-down menu. A new pop-up window will appear with a list of options for what you want Gmail to do with emails that meet your search criteria.
For example, you can choose to have all emails from the sender automatically archived or marked as spam. You can also choose to have Gmail apply a label to the emails, which is helpful if you want to be able to find them easily later on. You can also choose to have Gmail forward the emails to another email address, useful if you want to automatically send emails from a certain sender to your work address.
When you're finished, click on the "Create filter" button at the bottom of the pop-up window.

And that's it! Now, all future emails from the sender will be automatically sorted according to the criteria you selected.
If you want to remove the filter later on, go to the "Settings" cog in the top-right corner of your Gmail inbox and select "See all Settings" from the drop-down menu.
On the Settings page, scroll down to the "Filters and Blocked Addresses" section. You'll see a list of all the filters you've created, along with an "Edit" and "Delete" button next to each one. To remove the filter, click on the "Delete" button.

So, that's how to sort your Gmail inbox by sender using filters. Filters are a great way to automatically organize your inbox and make sure that only the emails you want to see are visible.
Sorting Gmail inbox by sender is as easy as that
If you want to sort your Gmail by the sender, all you need to do is follow these simple steps. After following these steps, you'll be able to quickly and easily see which senders are taking up the most space in your inbox.
You can then take action accordingly, whether that means unsubscribing from some emails or creating folders for others. Sorting your Gmail by sender is a great way to move and process emails from a particular sender all at once.