

An alias is a great way to keep your personal and professional emails separate. With an alias, you can log in to your personal account and send emails from another account you own, like a school or business email. Plus, if you ever need to change your primary email address, you can do so without having to update everyone in your address book.
So, how to send an email from an alias in Gmail? In this article, we'll walk you through the step-by-step process of how to set up and send with an alias in Gmail. We'll also share some important tips and information about using aliases in Gmail, so be sure to read on!
How to send an email from an alias
Step 1: How to set up an alias in Gmail
It's actually very simple to send an email from an alias in Gmail. First, we need to set up the alias in Gmail.
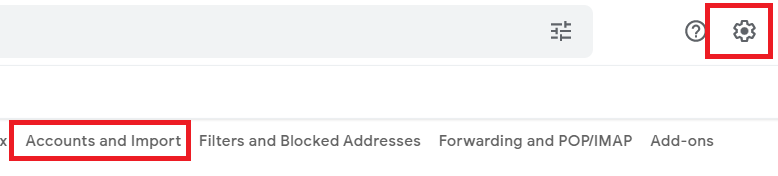
Open your Gmail account and click on the gear icon in the top right corner of the screen. From the drop-down menu, select "See all settings.” That’ll open up all of your Gmail settings.
Next, click on the "Accounts and Import" tab to access your settings for alias email in Gmail.
.
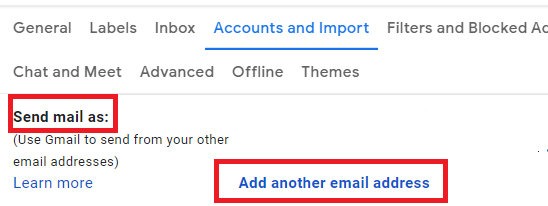
Step 2: Add your other Gmail email address (alias)
Scroll down to the "Send mail as" section and click on "Add another email address.”
When the new window pops up in Gmail, your alternate email address will need to be added along with the name you want to appear to recipients. Confirm that the "Treat as an alias" option is marked and click "Next Step" when you're done.

Step 3: Confirm the Gmail alias address
In the next step, you'll need to verify that you own the email address you want to use as an alias in Gmail.
To perform the verification, click ''Send verification.'' You should receive a verification email at your alias address.
Open the email in your other account and click on the verification link or enter the confirmation code in the corresponding field. When you're done, click "Verify".

Once you've verified your alias, you'll be taken back to the "Send mail as" page in your Gmail settings. Your alias should now be listed under the email addresses you can use to send messages.
If you want to add another alias, simply repeat the steps above. Now that we've added our alias, it's time to learn how to use it to send an email.
Step 4: Change “From” address in a Gmail compose window
To use your alias when sending an email, in Gmail, change your ‘from’ address. You’ll be doing this in the compose email window but before sending the message, you'll be clicking on the "From" field to open the drop-down menu.
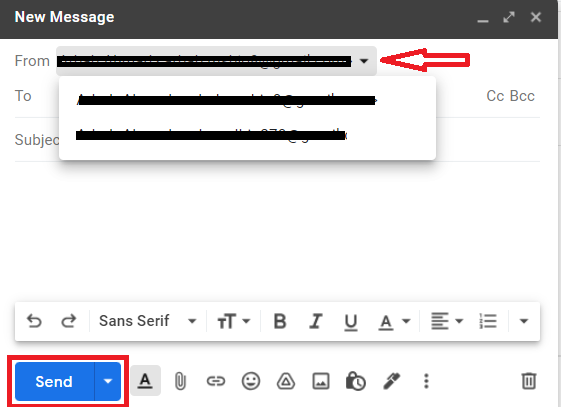
Your alias should be listed as one of the options. Select it and hit "Send" to send your email as the alias you’ve selected.
That's all there is to it! Now you know how to create and use an email alias to keep your primary email address private.
However, your personal email address would still be visible to the recipient in the email headers. Likely, most recipients aren't going to go through the headers, but it's important to keep in mind. If you’re using an alias to send sensitive information, it means that anyone with access to the email headers could potentially see your personal address.
Let's take a look at some important things to keep in mind when using email aliases.
Important notes about adding an alias to Gmail
You can make your alias the default “From” address
The great thing about email aliases is that you can make them your default "From" address. That way, you don't have to select your alias every time you want to use it.
To make your alias the default, simply go to your Gmail settings and click on the "Accounts and Import" tab. Scroll down to the "Send mail as" section and click on the "Make default" link next to your alias.

Now, whenever you compose a new message, your alias will be the default "From" address.
You can remove an alias at any time
If you no longer want to use an alias, you can remove it at any time. To do so, simply go to your Gmail settings and click on the "Accounts and Import" tab. Scroll down to the "Send mail as" section and click on the "Delete" link next to your alias.

A pop-up will appear, asking you to confirm that you want to delete the alias. Once you click "OK," your alias will be removed and you will no longer be able to use it to send emails. This feature is great if you want to use an alias for a short period and then remove it.
An alias in Gmail may affect deliverability
When using an alias, it's important to keep in mind that your messages may be marked as spam more often.
When an email is sent, it contains certain headers that provide information about the sender. One of these headers is the "From" header, which includes the email address that the message was sent from. Another important header is the "Sender" header, which includes the email address of the person who actually sent the message.
In most cases, these two headers will contain the same information. However, it is possible to send an email using an alias, in which case the "From" header will list the alias while the "Sender" header will list the real email address.
When this happens, the email lacks a DKIM signature, which makes it more likely to be marked as spam if SPF fails, too. As a result, it's important to be careful when sending emails using an alias, as there is a greater chance that they will be marked as spam.
Use YAMM to send mail merges through alias emails in Gmail
By following the steps in this article, you will be able to set up and send an email from an alias in Gmail. If you use Gmail for business purposes, consider installing YAMM to streamline the process of sending mass emails.
When you start your mail merge with YAMM, you can pick which address you’re sending from and can choose an alias. You can also easily write and format your message, add a CTA button or link, track results in real-time via Google Sheets, and more. Plus, with our installable app, it's easy to get started right away. So what are you waiting for? Install YAMM today!