

You sit back with a click and a sigh. After a few grueling days of pulling together content for your latest email campaign, it’s been sent. You breathe a sigh of relief and wait for the responses, excited.
Except, what you don’t know is some bad actor has hijacked someone’s else mail server and is using it to send emails with your domain name. You start getting responses alright … just not the ones you had hoped for.
Clients are furious. “You” have emailed them a virus that seizes their machines and shows an endless loop of cat videos. You apologize, but the damage has already been done.
Sound familiar? Hopefully not. Nevertheless, email security is an essential consideration for marketers. In this article, we’ll explore one key aspect of keeping your email account secure: your Google SPF record.
What is domain SPF and why should you create an SPF record for your domain?
The example above represents an outcome on the ‘annoying’ end of the spectrum. But this isn’t always the case, as Snapchat and Sony found out.
Hackers were able to access their records because some basic security protocols weren’t followed – one of which was setting up an SPF.
An SPF or Sender Policy Framework is stored on your domain DNS. It allows servers that receive mail to check against a list of sender mail server IP to validate them.
When someone receives an email from your company, the receiving server checks your SPF to verify your credentials. This way, the people you send emails know they are from you.
Why you need a Google Mail SPF record
The potential for damage to your business prospects is real if you don’t set up your Google Workspace SPF record.
Spoofed emails and spam can jeopardize your sender reputation and even land you on Google’s blocklist. At the very least, without an SPF in Google, your emails may start ending up in the Spam folder.
Email marketing remains the top way to reach out to new clients. Imagine if you were cut off from lucrative new markets because of the bad behavior of someone else.
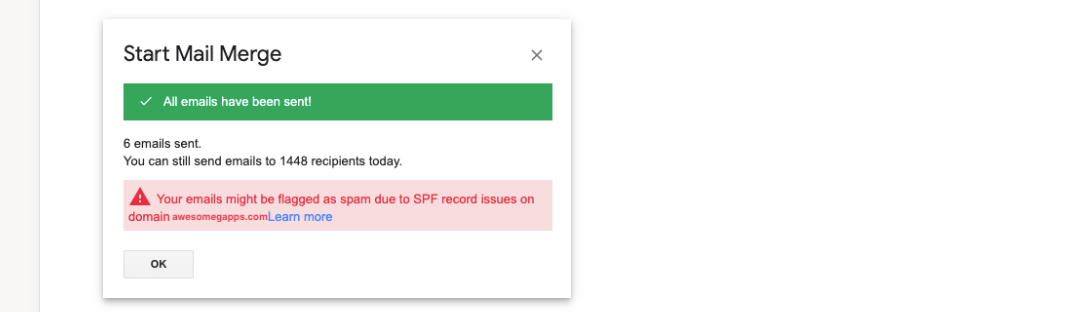
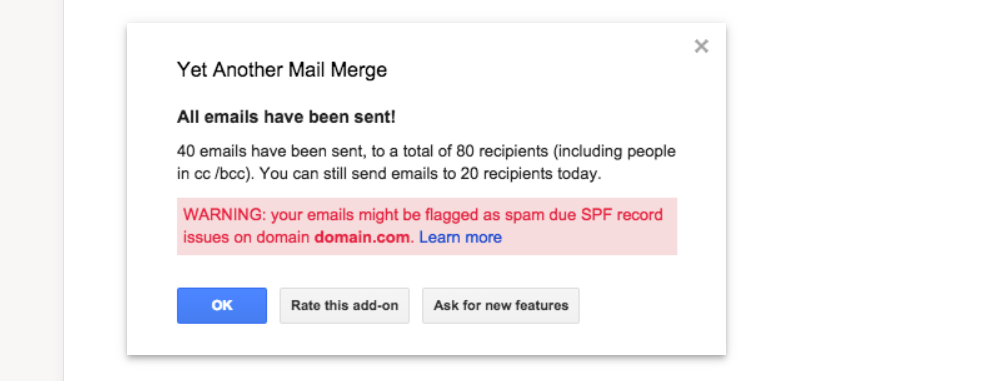
Surprisingly, most companies and business owners aren’t even aware that they have a problem that can be resolved by adding SPF records. The first indication might come when their bulk mailer sends them a message like this.
Given the costs involved, you might be wondering how to set up an SPF record.
What you’ll need to set up an SPF record for Gmail email
- Access to your IT department/a tech-savvy human/your Google Workspace administrator
How to add an SPF record for Google Workspace (formerly GSuite)
Step 1: Get the standard TXT record for Google Workspace (this is a part of the record)
If you get a message from your bulk mailer like the one in the graphic shown earlier, the first thing you need to do is let your IT department know.
This is of course providing that your company is large enough to have its own IT department. If it’s your tech friend that comes by to check stuff once a month, or only you working solo, you can do your own validation with a Google SPF record checker tool like the one seen here at https://mxtoolbox.com/spf.aspx.
If this check reveals a problem, you’ll need to create a TXT record on your domain DNS.
A TXT record stores records on information contained within a DNS server. An SPF record is a type of TXT record that stores email authentication information.
A domain is only allowed to have one SPF record. This is important to remember for reasons we’ll get into later. Note that the TXT record itself can contain several pieces of information.
If you email out of Google workspace, this is the standard TXT record identifier that you should use:
v=spf1 include:_spf.google.com ~all
Once you have this bit of text, you have to define and add your email server’s information.
Step 2: Access your personal server info (also a part of the record)
The Google Workspace text is only the first part of the information needed for the TXT record and usually forms the first line.
Your server information goes next. This is usually the IP address for your mail server.
You’ll also want to add IP addresses for third parties that you want to send an email on your behalf (like Gmail, Yahoo, or Outlook). You are allowed a maximum of 10 IP addresses on your email SPF record.
You’re now ready to input this information into your domain.
Step 3: Locate your Domain Management Console
You’ll need to add an SPF record to your domain. A domain is the location of a site on the Internet. A domain management console hosts the configuration information for it.
You will find your domain management console in different places depending on how you got your domain.
For example, if you purchased your domain from a company, you should log in to your account to access the console there. Each domain company has different rules for adding TXT records, so you should research the particular ones that apply to yours.
Step 4: Add your Google Mail SPF record
Once you’ve accessed this area, you will see several empty fields. The first usually requires that you define the type of information you are adding. You put TXT under that column.
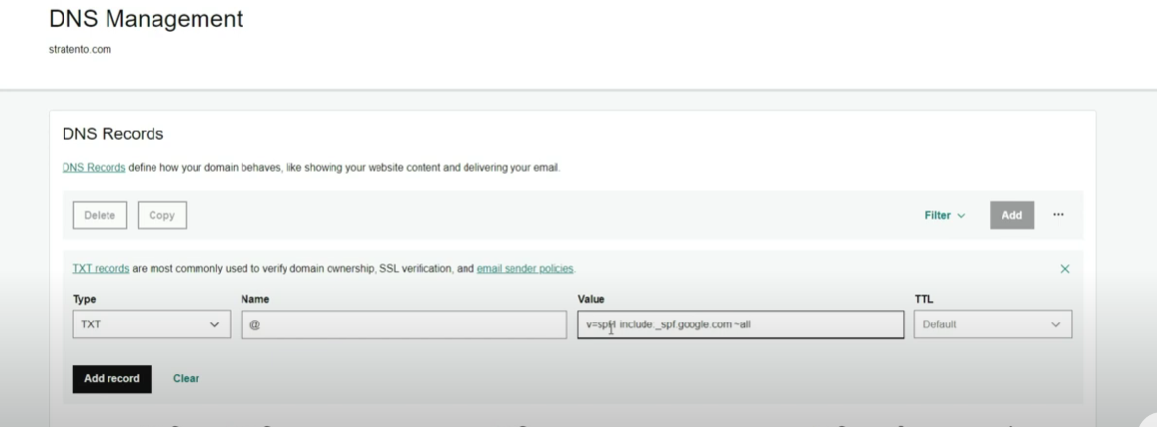
In the second field, which is usually labeled host, you put the “@” sign.
Next, you have to input the value. If you just use Google Workspace, place the bit of text we showed you earlier here.
Finally, you add the TTL or “Time to Live” data. The standard Time to Live for this information is 1 hour. However, the time is usually entered in seconds, so this should be 3,600.
You’ve just been successful in adding SPF records! You can run the SPF record tool we introduced you to earlier to check its validity.
If you’ve cleared this step and everything okay with your record, note that it can take as long as 48 hours to come into effect once you’ve uploaded the information.
Step 5: Update your SPF record as necessary
This should be done once you include new third-party email senders or add new internal mail servers.
Things to be careful of while adding an SPF record in Google Workspace
Again, because of the relative simplicity of creating a Google Workspace SPF record, people tend to underestimate the importance of getting them right.
When this happens, mistakes get made that can cause your emails to bounce for technical reasons. Here’s a list of some of the errors you should look out for when you’re about to add an SPF record:
- Including more than 10 IP addresses in your SPF record
Among its many strengths, one of the weaknesses of the SPF record is that only 10 IP addresses can be included. This can cause the recipient server to reject all of your emails and not just those with technical issues.
- Duplicating an SPF record
Remember, your domain is only supposed to have only one SPF record. Multiple records will result in permanent delivery errors.
- Typos in your IP addresses
Incorrect details in your IP addresses, whether internal or external, can result in recipient servers being unable to authenticate your emails.
Don’t forget to add other layers of security
If your email goes on to someone’s inbox, it shows up with a question mark. This signals to them that your email should not be opened and you’ll be marked for the spam folder.
For some experts, having an SPF record is only the first line of defense. Having it as your sole email authenticator is something they weigh in against.
To support it, they recommend also setting up Google DKIM (Domain Keys Identified Emails) and Google Workspace DMARC (Domain-Based Message Authentication, Reporting, and Conformance).
DKIM will encrypt and add a unique signature to your emails. DMARC will track whether your emails are being authenticated. They add an extra layer of protection to your SPF record.
What about my bulk mailer?
You may be asking, “Wait…isn’t my bulk mailer supposed to take care of these things?” Actually, no.
You have to learn how to add SPF records because it is exclusively your responsibility. Most mail programs don’t have access to the information required to do this for the security and integrity of your email.
Most will not inform you that this is a problem. You’ll only be seeing your rate of bounced emails go up, without understanding why.
It’s only when it lowers your sender reputation you may be prompted to find out why.
That’s why YAMM’s notification feature is such a benefit.
You’ll know almost immediately if delivery issues stem from your end and what to do to fix them.
YAMM does not require an SPF record to work, so once this issue is sorted out, your emails will be delivered without the flag notice.
Keep your email secure and your marketing on point with YAMM
As an app officially recommended by Google Workspace, YAMM also has lots of great features that can provide further support for your email campaigns. You don’t have to do this alone.
Find out what YAMM can do to enhance the deliverability of your campaigns.