

Some metrics suggest that the average ROI for email marketing is $36 for every $1 spent. That makes it one of the best ways to utilize your marketing budget.
But to be effective with this method, your emails need to be delivered to your target audience’s inbox – not their spam or junk folders.
Adding DKIM verification to your Google Workspace makes this likelier to occur and it could be the key to unlocking the full potential of your email marketing campaigns.
What's in this G Suite / Google Workspace DKIM Guide?What DKIM is and why it matters
- The essential toolkit for enabling DKIM
- Step-by-step instructions for setting up DKIM in your Google Workspace
- How to make the most of DKIM in Google Workspace with YAMM
Let’s get started.
What is DKIM, and why does it matter?
DKIM defined
Domain Keys Identified Mail (DKIM) is an email authentication technique. When it’s enabled, it allows the receiver of an email to verify that a message was sent from the appropriate domain address.
How DKIM works
DKIM works through the interaction of two keys – a public and a private one.
When you have DKIM enabled, a public key is added to your DNS records. This gets broadcasted to the world whenever you send an email. That way, when you send someone a message, their server also gets your public key information.
The server can use that public key to perform a check against your private key. If everything is authentic, the check will pass and the message will be delivered to the recipient’s inbox.
If the check fails, then that’s a sign that the message has been tampered with in some way during the transmission process and the message will go to junk or spam.
How setting up DKIM affects email deliverability
Email servers are designed to automatically filter out junk and spam messages. They do that because these messages typically have malicious intent.
The problem is that sometimes legitimate messages also get marked as junk or spam. This can happen for lots of reasons. But the more it does, the more likely it is to continue happening in the future.
When you add a DKIM signature to your emails, it gives the recipient’s server a much higher degree of certainty that your messages are legitimate.
This increases the likelihood that your emails make it to your audience’s inboxes. And that’s a necessary step toward optimizing the performance of your email marketing campaigns.
How to set up DKIM in your Google Workspace
Step 1: Make sure you’re ready to set up DKIM

Before you attempt to turn on DKIM in your Google Workspace, you’ll first want to gather a few pieces of information.
First, you’re going to need the login information to your Google Admin Console, which you may or may not have already. If you don’t, then you can get it by reaching out to your domain provider.
Next, you also need to determine which type of DKIM keys your domain provider supports. You can typically choose between 2048-bit and 1024-bit keys. But Google recommends that you go with 2048-bit since it’s a more secure option.
Step 2: Verify your outbound gateway settings won’t cause any problems
Some organizations use special outbound gateway settings to bring some uniformity to their outgoing messages, such as adding a special footer to everything that comes from your company.
If you have settings like this enabled, it’ll cause your DKIM check to fail. Because to pass DKIM, a message cannot be altered after it’s been sent.
There are two fixes to this problem:
- Change your outgoing gateway settings so that it doesn’t modify messages
- Set up the outbound gateway to make changes to your organization’s messages before they’re sent
Step 3: Generate a DKIM key from your Google Admin Console
Now you’re ready to begin the setup process itself. To start setting up DKIM, generate a key through Google’s Admin Console.
Note: to complete this step, you need to be logged in as a super administrator.
Here’s how to do it:
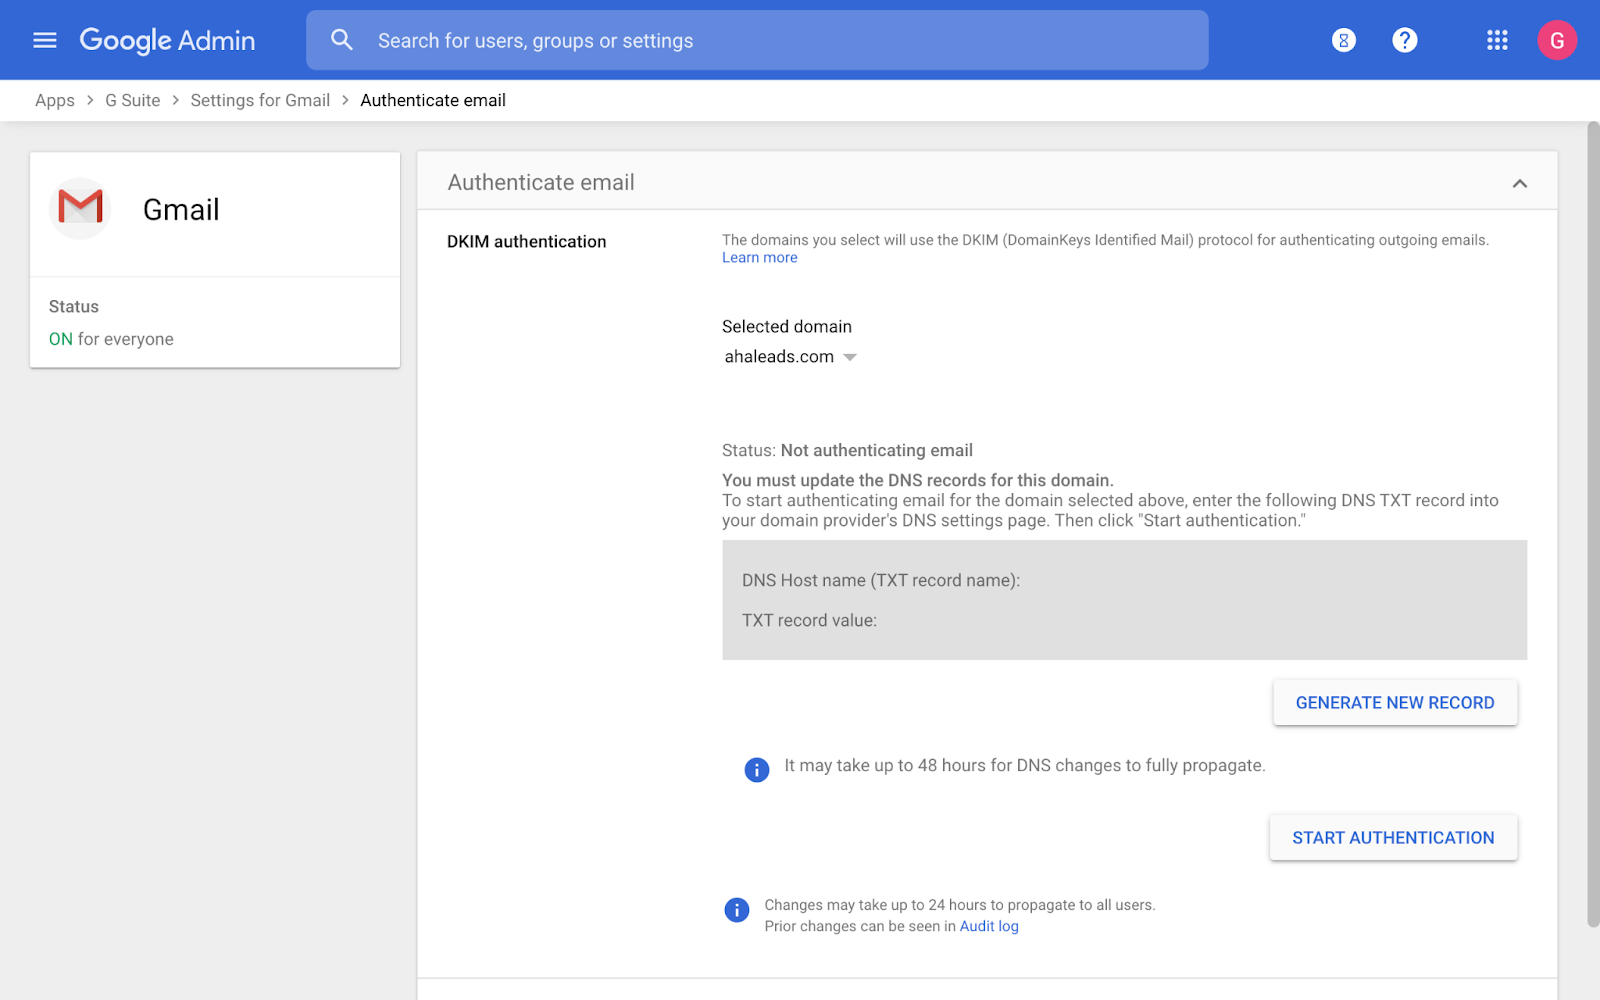
- Sign in to Google Admin Console
- Navigate to Apps > Google Workspace > Gmail
- Find the Selected domain menu, then choose the domain on which you want to set your Gmail DKIM
- Click the Authenticate email button that pops up
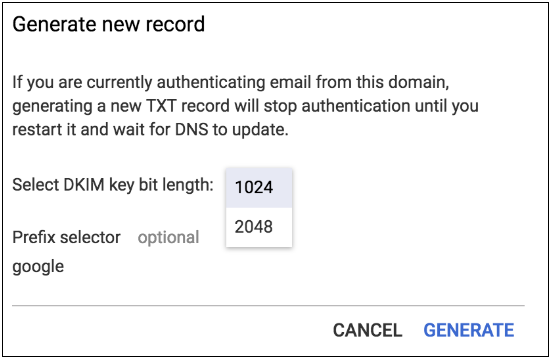
- Click the Generate New Record button
- Choose your DKIM key settings in the Generate new record box
- Click Generate once you’ve made your selections. When you do, the text string under the TXT record value should update to a new key.
- Copy the DKIM values that show up in the Authenticate email window. This is what you’re going to add to your domain information in the next step.
Step 4: Add your TXT record name & DKIM key to your domain
Now you’re going to take the information that you got out of step one and bring it to your domain provider.
Here are the steps for this part:
- Navigate to your domain provider’s website and sign in to the management console
- Find the page where you can update your DNS settings
- Add a TXT record for DKIM. Put your TXT record name in the first field for the DNS hostname. Then, in the second field, put the TXT record value (which is also your DKIM key).
- Save your changes and navigate back to the admin console for the next step
Step 5: Turn on DKIM signing
At this point, you’ve set up everything that you need to set up and you’re ready to turn DKIM signing on. Here’s how to do it:
- Sign in to your Google Admin Console
- Once there, navigate to Apps > Google Workspace > Gmail
- Click on Authenticate email
- Navigate to the Selected domain menu and choose the domain where you want to activate DKIM
- Click on the Start authentication button. If everything is working correctly, your status at the top of the page should change to Authenticating email.
Step 6: Verify that DKIM is working properly
You can perform a simple check to make sure that everything you’ve done so far has turned out correctly by taking the following steps:
- Send an email to someone who uses Gmail (it can’t be your own address)
- Open up the message in the recipient’s inbox and locate the message header. You can find this by clicking on the More button next to Reply and then clicking on Show original.
- In the message header, look for Authentication-Results. It should show something like DKIM = pass or DKIM = OK. If there’s no line about DKIM in the header at all, it means something went wrong with the process.
Potential challenges to look out for during the DKIM setup process
Setting up DKIM in Google Workspace isn’t the easiest thing to do. Here are a few issues that you might run into during the process and guidance for overcoming them.
The “You must update the DNS records for this domain” message
You need to go to the Authenticate email page to set up DKIM. But when you do, you may get a message that says “You must update the DNS records for this domain”. That could show up for you even after you’ve already followed all of the steps of setting up DKIM.
If you see this and you think you’ve done everything correctly, don’t worry. Google may show this message for up to 48 hours after you’ve updated your Google DKIM record settings.
You’re unable to begin the DKIM setup process
You might also run into an issue that doesn’t allow you to begin the DKIM setup process at all. If so, it could be because you’ve just created a new Gmail account for your organization.
Google won’t let you turn on DKIM for Gmail for 24-72 hours after you create a new account. So you may need to let that amount of time go by before getting started.
Getting through other issues
DKIM can be a bit complicated, so there are a host of other less common issues that you may run into as well.
If you do, then your first step should be checking Google’s DKIM troubleshooting page. It includes several strategies you can use to pinpoint your issues and resolve them.
But if that doesn’t work, then it could be time to reach out to an IT professional. They can provide you with the personalized support that you need to figure this out.
Improve your deliverability at scale with mail merge services by YAMM
Message deliverability is crucial to the success of your email marketing campaigns. DKIM helps with this, but it’s not the only method you can use to make sure fewer of your messages end up in users’ spam boxes.
Personalization is a proven method for improving deliverability and increasing open rates. But it can be tough to personalize your emails at scale on your own.
That’s where YAMM comes in. Our mail merge tool is a lightweight Google add-on that makes it easy to automatically send out personalized messages directly to your leads’ email inboxes.But don’t take our word for it. Sign up for free today to experience the value we provide.