
Research indicates that the average person receives over 120 emails per day. That volume can make it difficult to read and respond to the most important messages that you get promptly.
Thankfully, Gmail has a solution for this. You can create rules in Gmail to automatically move emails to a folder from your inbox and help you stay on top of your messages.
We’ll show you how to create rules in Gmail to move your emails to specific folders through two different ways in the article below.
An introduction to Gmail rules to move emails to folders
What are Gmail rules for email?
A rule in Gmail is another word for a filter. So, when you create a Gmail rule you essentially create a filter in Gmail. You can create email rules in Gmail to automate what happens to different types of messages when they hit your inbox.
The purpose of setting up rules in Gmail
Gmail rules were designed to help you manually or automatically organize your emails in Gmail. To that end, you can use them to:
- Create rules in Gmail to move emails to folders
- Send messages from certain senders to your spam box
- Star messages with certain phrases
- Forward messages with certain subject lines to other email addresses
- Other automations to help you organize messages or responses
The bottom line is that you can use rules to optimize what happens to different messages, helping you to get more out of your Gmail account and avoid missing important messages.
How to set up rules in Gmail
There are two different ways to set up new rules in Gmail. You can either create a new rule from scratch or use an existing message or group of messages to create a rule.
We’ll start by showing you how to filter emails in Gmail to a folder by creating Gmail rules from scratch.
Step 1: Open Gmail and start a search
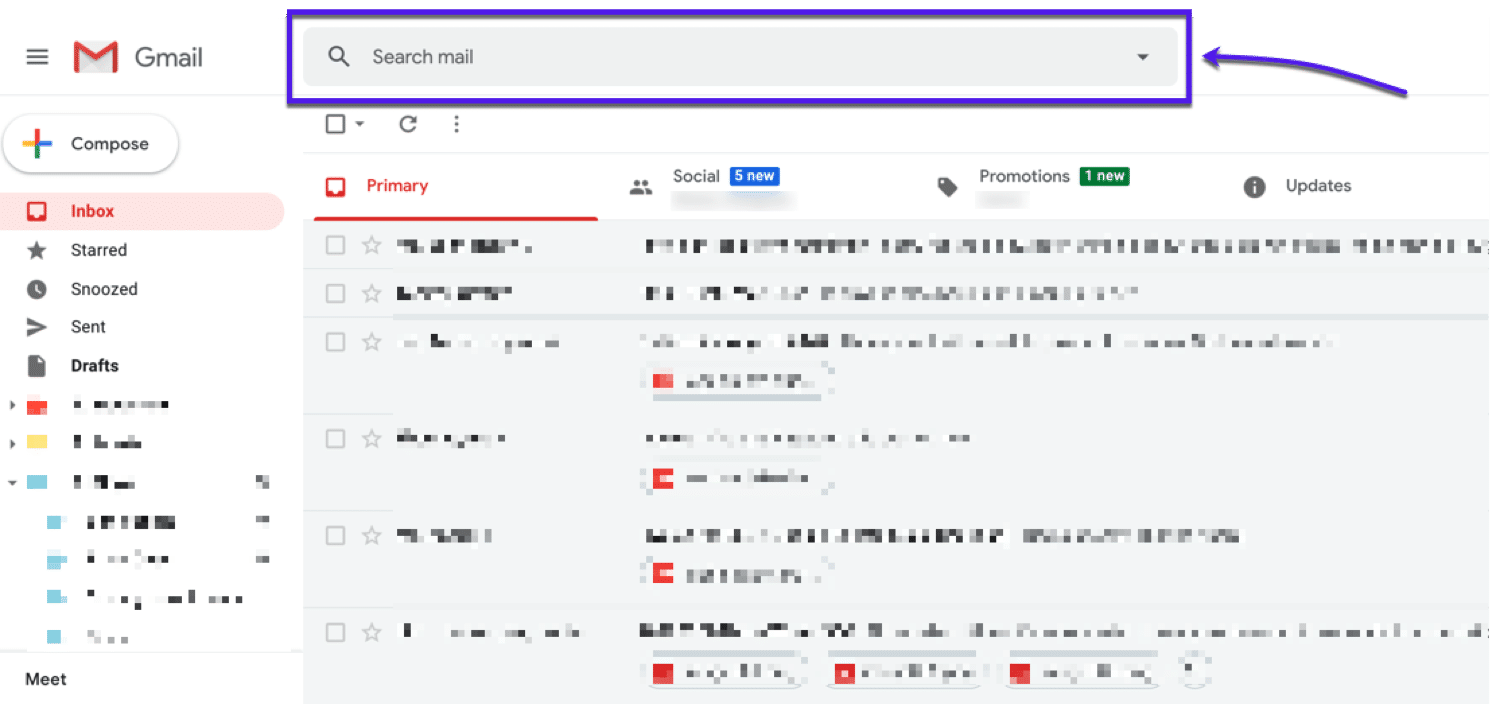
Begin by opening up your Gmail account and navigating to the search bar. You can see where that is in the screenshot above.
From there, click on the dropdown arrow that you see on the far right-hand side of the search bar.
This may look like something else depending on which version of Gmail you’re using. But just click on whatever is there for you and you’ll get to the right place.
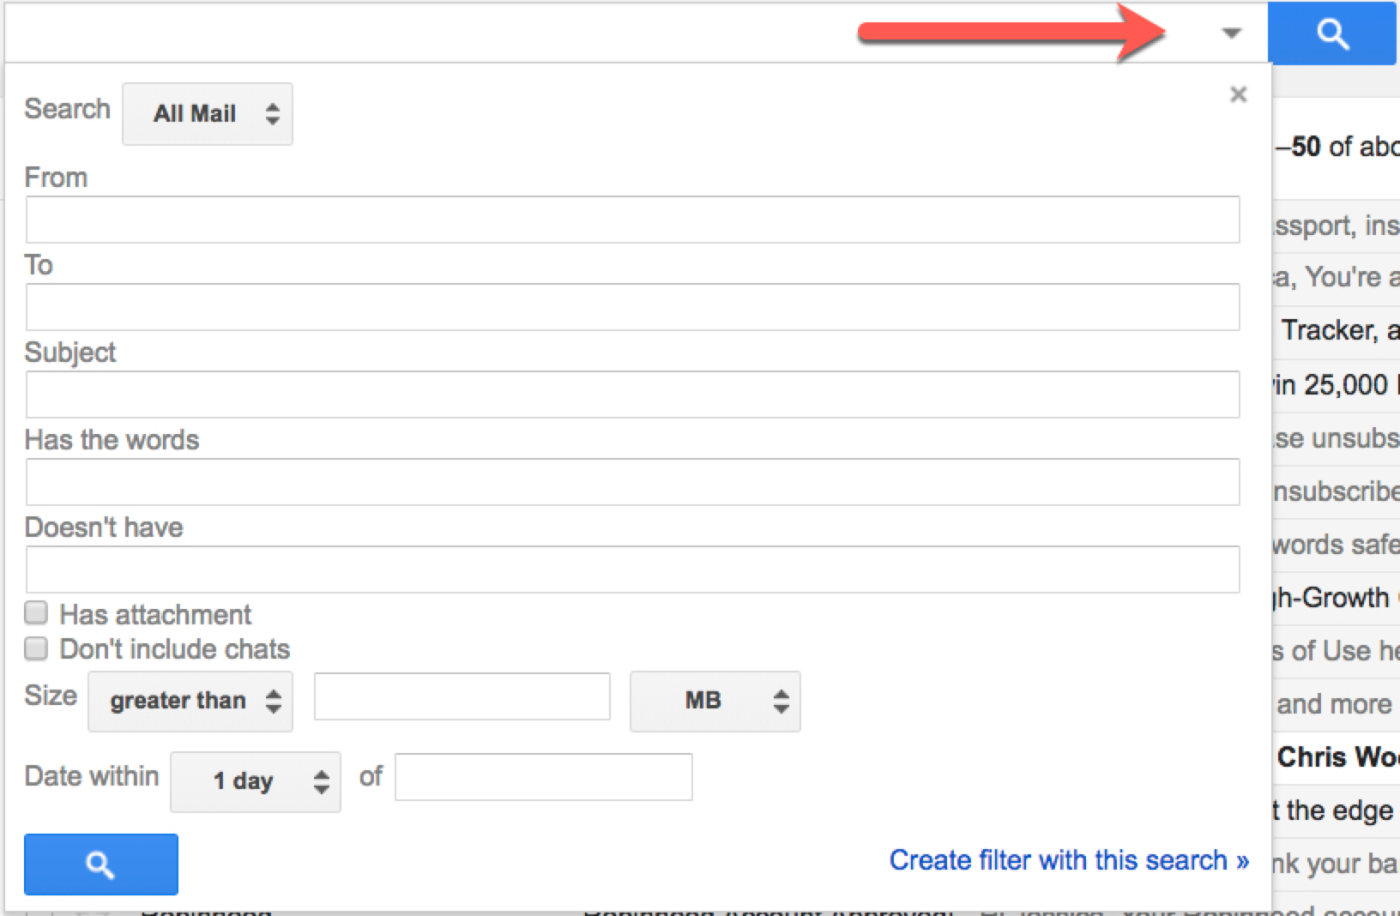
Step 2: Pick from different types Gmail email filters

Clicking on the right-hand side of your search bar will bring up the menu that you see in the screenshot.
This is where you decide which filter you’ll create. As you can see, there are lots of Gmail email rule options to choose from, including:
- From and to email addresses
- Subject line text
- Words include or not included in the message
- Attachments
- Message size
- Date
Pick whatever criteria you want to use for your new filter and then you’ll be ready to move on to the next step.
Step 3: Click on “create filter” to set up filter rules in Gmail
If you look at the screenshot from the previous step, you’ll see an option that says, “Create filter with this search”. To create filters in Gmail, that’s what you’re going to click on after you’ve finished selecting your filter criteria.
Step 4: Choose the desired behavior for filtered messages

You should see a menu like this appear on your screen after completing the last step. This is where you decide what’s going to happen to the messages that you’ve decided to filter.
You can:
- Add a label
- Mark as read
- Star, forward, or delete
- Mark as important
- Put in a category
It’s worth noting that you can set multiple Gmail rules here. So you could mark messages as important and star them. Or add a label and mark them as read, if you want.
This gives you a lot of control over what happens to different types of messages. It should be enough to help you organize your inbox however you want.
Step 5: Activate the new Gmail filter rule
Now all that’s left to do is activate the new rule that you’ve sent. That’s as easy as clicking on the “Create filter” button that you see in the bottom right-hand corner of the screenshot above.
Once you do this, the rule will automatically begin filtering your messages as you’ve requested.
Don’t worry if you make a mistake. We’ve included instructions for editing and deleting rules in a later section.
How to make rules in Gmail from existing emails
Now let’s look at how to create a filter in Gmail from an email or group of emails that you already have in your inbox. The process is similar to creating rules in Gmail from scratch.
Step 1: Choose the messages you want to filter
You can choose the existing messages that you want to filter in two ways. First, you can do so while reading an email, like this:

Or, you can choose multiple emails to filter at the same time from your standard inbox screen, like this:
Both options will take you to the same place. The only difference is that you can select multiple emails with the second method but will only be able to select one at a time with the first.
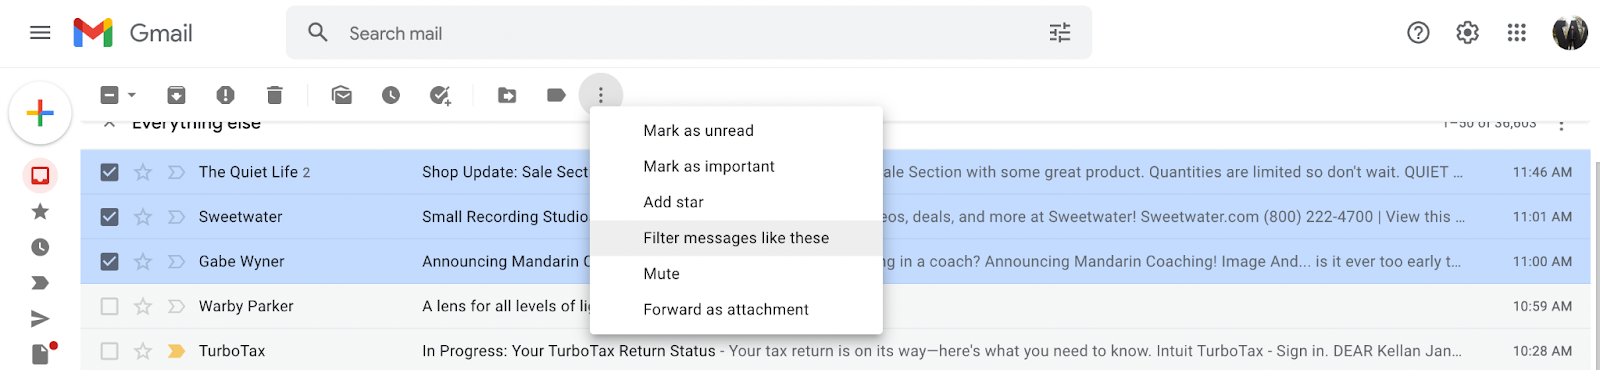
Step 2: Press “filter messages like these”
Once you’ve chosen the messages that you want to filter, you click on the three horizontal bars near the top of your screen. You can see what this looks like in the screenshots above.
When you press on that icon, it’ll show a dropdown menu. Click on “Filter messages like these” to complete this step.
Step 3: Follow steps 2 - 5 from the previous section
Everything from this point until completion is the same as it would be if you were setting up a new rule from scratch. So you can follow steps 2 - 5 from the previous section to complete your new rule.
The only thing to note is that some of the information will be auto-populated for you when you reach this screen:
The information that you see comes from the email that you’ve selected. Just make sure that you don’t delete it. Otherwise, you won’t end up filtering the messages that you meant to.
Managing your email rules in Gmail
Sometimes you’ll create an email rule in Gmail that you need to change or get rid of down the line. We’ll tell you how to do that in this section.
Step 1: Navigate to Settings > Filters and Blocked Addresses
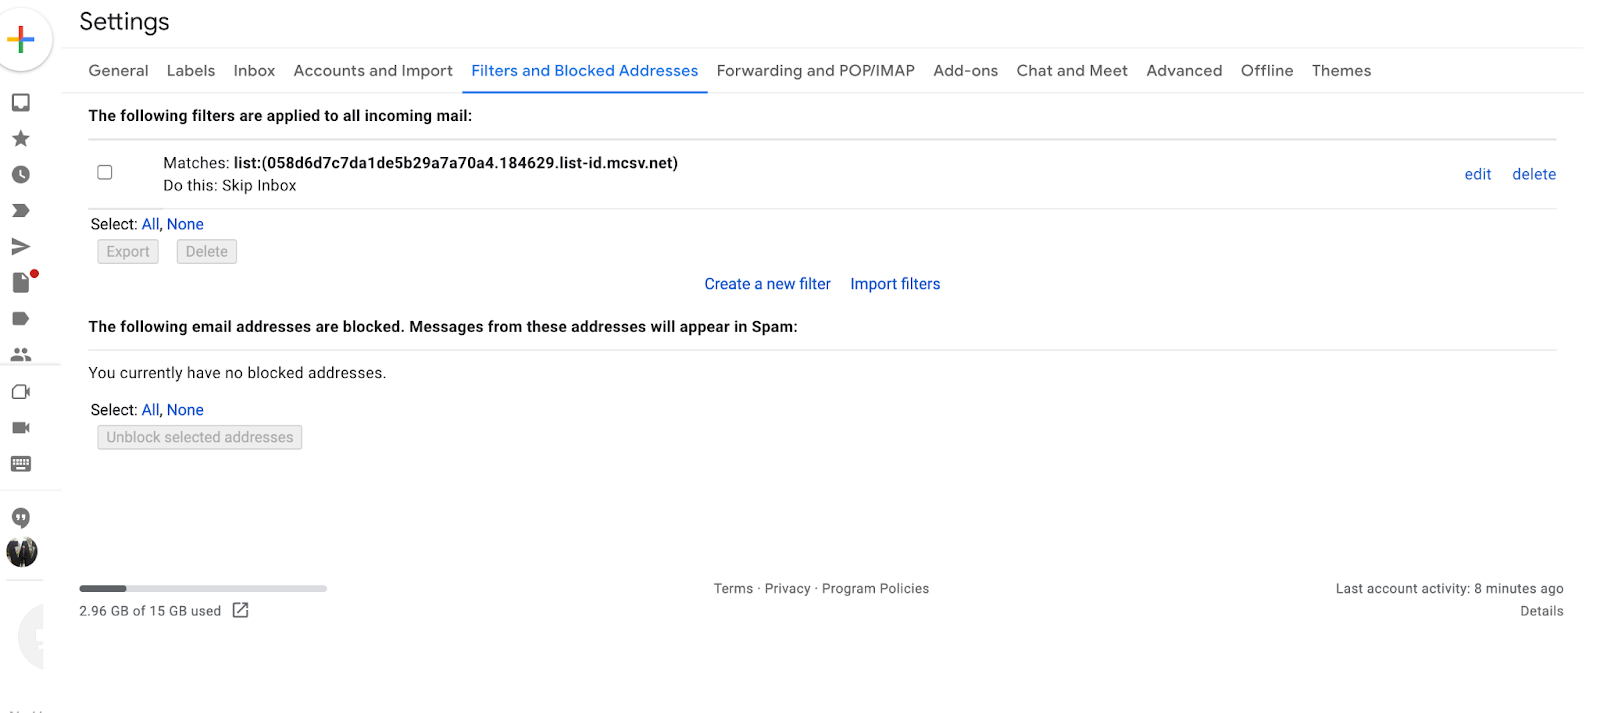
You begin the process by opening up the Settings page on Gmail and clicking on Filters and Blocked Addresses.
When you get there, it should look like what you see in the screenshot above.
Any filters that you have will be listed under the heading that says “The following filters are applied to all incoming mail”.
Step 2: Edit or remove the filter rule in Gmail
From this menu, find the rule that you want to change or delete. Then click on either edit or delete accordingly.
If you delete the rule, it will just disappear from the menu and you’ll be done.
If you edit the rule, it’ll pop up with a menu that looks the same as the ones that we dealt with in the previous sections while setting up a new filter.
Editing a rule makes sense when you want to add new addresses or email types to a group of emails that you’re already filtering a certain way.
For example, maybe you’ve set up your Gmail account to mark every email from your boss as important. If your boss gets a new email address, you could edit the existing filter and add that address to it instead of setting up a new rule from scratch.
Most useful Gmail label rules
Now that we know what Gmail rules are and how to set them up, let’s take a quick look at some of the best rules for optimizing your inbox.
Automatic deletion of all marketing emails
Perhaps the biggest hurdle to organizing your inbox is getting rid of all of the marketing emails that you get.
You can set up a filter that does this for you automatically with Gmail rules. To do so, just create a rule that filters every email with the word “unsubscribe” in it.
You can set that filter to delete all of these emails, archive them, or mark them as spam according to your preferences.
Star all emails from a certain domain
Many companies use their own domains. So if you want to make sure that you never miss a message from a company with its domain, you can set up a filter that makes that happen.
Just follow the steps we’ve outlined above to create a filter for all email addresses that end in the company’s domain name. Then, set the action for that filter to start the messages.
Get more out of your Gmail account with YAMM
Gmail rules are a helpful way to organize the messages that you receive, but they don’t do anything to help you get more control over the messages that you send.
For that, you should consider YAMM. Our mail merge add-on for Gmail lets you:
- Schedule groups of emails for precise deliveries
- Send out many personalized emails from a single template
- Track the results of your email campaigns
- And more
With YAMM and Gmail rules, you get the best of both worlds when it comes to managing the messages that you receive and the ones that you send.
So why wait? Sign up for a free version of YAMM today to see how we can help you get more out of your Gmail account.