Code and create your own template in Gmail using HTML/CSS
With YAMM, you can already send campaigns with a simple template. But you can also choose to create an advanced formatted newsletter using HTML and CSS directly in your Gmail draft.
That is useful if you want to use media queries in your Gmail draft to change your template style depending on your screen size. For example, you can insert media queries in your HTML code to display your newsletter differently when opened on mobile phones. It is also more convenient to write your code directly in Gmail than in the developer tool.
- Send a mail merge with YAMM using a coded HTML/CSS draft saved in Gmail
- Comfortable with HTML and CSS code
- Familiar with sending regular emails with YAMM
Send personalized webinar invitation emails to a mailing list using a custom HTML/CSS template with media queries
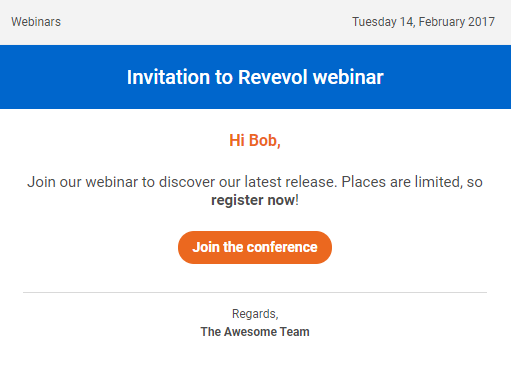
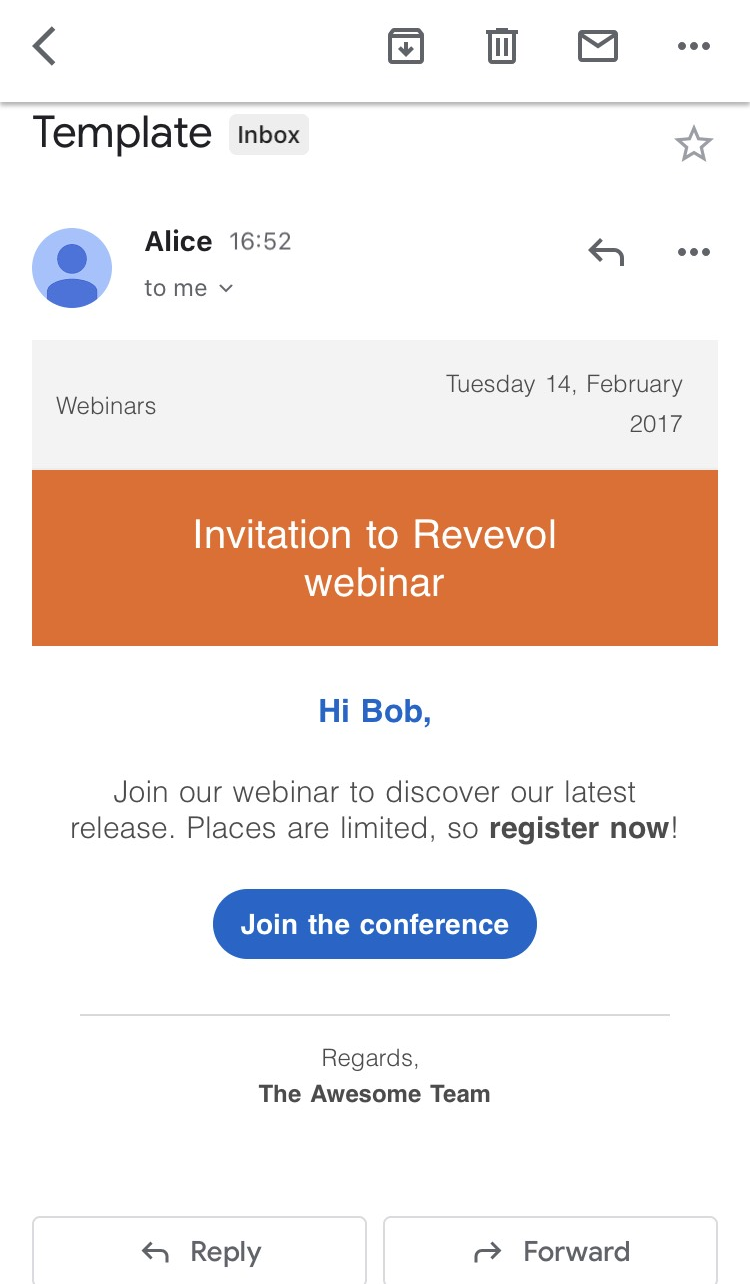
Thanks to the media queries, the orange and blue colors are reversed when the email is opened from a mobile phone. You can modify the styles to change other elements (like the font size etc.).
To reproduce the same results and send this email template with YAMM, please follow these steps:
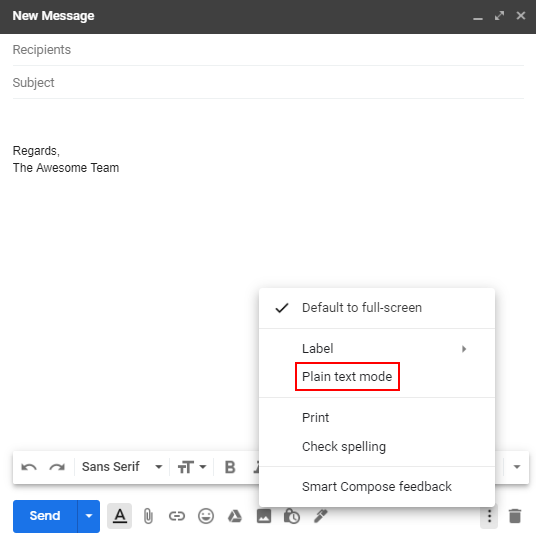
1. Activate 'Plain text mode'
The purpose of this is to get rid of any formatting that can cause troubles and overlaps with the HTML code that you'll insert later in this draft.
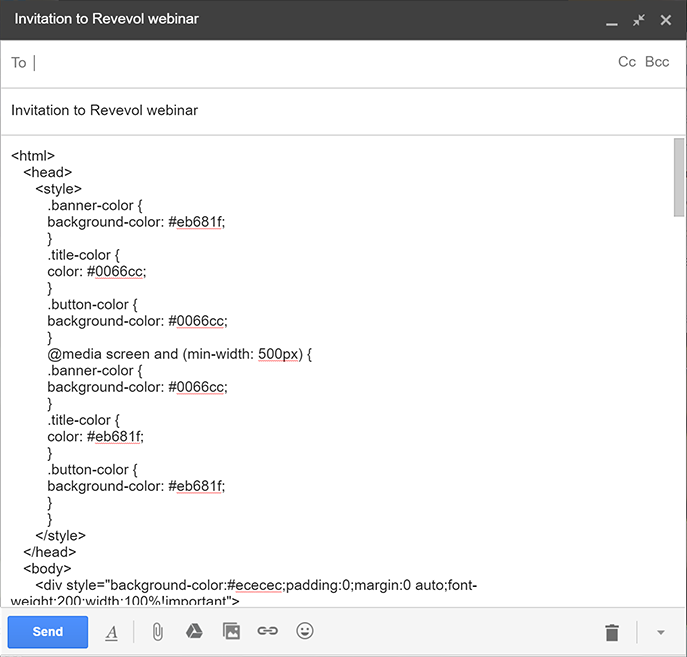
2. Code your template in a Gmail draft
Or simply copy the following example code (starting from <html> to </html>), and paste it into your Gmail draft.
<html>
<head>
<style>
.banner-color {
background-color: #eb681f;
}
.title-color {
color: #0066cc;
}
.button-color {
background-color: #0066cc;
}
@media screen and (min-width: 500px) {
.banner-color {
background-color: #0066cc;
}
.title-color {
color: #eb681f;
}
.button-color {
background-color: #eb681f;
}
}
</style>
</head>
<body>
<div style="background-color:#ececec;padding:0;margin:0 auto;font-weight:200;width:100%!important">
<table align="center" border="0" cellspacing="0" cellpadding="0" style="table-layout:fixed;font-weight:200;font-family:Helvetica,Arial,sans-serif" width="100%">
<tbody>
<tr>
<td align="center">
<center style="width:100%">
<table bgcolor="#FFFFFF" border="0" cellspacing="0" cellpadding="0" style="margin:0 auto;max-width:512px;font-weight:200;width:inherit;font-family:Helvetica,Arial,sans-serif" width="512">
<tbody>
<tr>
<td bgcolor="#F3F3F3" width="100%" style="background-color:#f3f3f3;padding:12px;border-bottom:1px solid #ececec">
<table border="0" cellspacing="0" cellpadding="0" style="font-weight:200;width:100%!important;font-family:Helvetica,Arial,sans-serif;min-width:100%!important" width="100%">
<tbody>
<tr>
<td align="left" valign="middle" width="50%">
<span style="margin:0;color:#4c4c4c;white-space:normal;display:inline-block;text-decoration:none;font-size:12px;line-height:20px">Webinars</span>
</td>
<td valign="middle" width="50%" align="right" style="padding:0 0 0 10px">
<span style="margin:0;color:#4c4c4c;white-space:normal;display:inline-block;text-decoration:none;font-size:12px;line-height:20px">Tuesday 14, February 2017</span>
</td>
<td width="1"> </td>
</tr>
</tbody>
</table>
</td>
</tr>
<tr>
<td align="left">
<table border="0" cellspacing="0" cellpadding="0" style="font-weight:200;font-family:Helvetica,Arial,sans-serif" width="100%">
<tbody>
<tr>
<td width="100%">
<table border="0" cellspacing="0" cellpadding="0" style="font-weight:200;font-family:Helvetica,Arial,sans-serif" width="100%">
<tbody>
<tr>
<td align="center" bgcolor="#8BC34A" style="padding:20px 48px;color:#ffffff" class="banner-color">
<table border="0" cellspacing="0" cellpadding="0" style="font-weight:200;font-family:Helvetica,Arial,sans-serif" width="100%">
<tbody>
<tr>
<td align="center" width="100%">
<h1 style="padding:0;margin:0;color:#ffffff;font-weight:500;font-size:20px;line-height:24px">Invitation to Revevol webinar</h1>
</td>
</tr>
</tbody>
</table>
</td>
</tr>
<tr>
<td align="center" style="padding:20px 0 10px 0">
<table border="0" cellspacing="0" cellpadding="0" style="font-weight:200;font-family:Helvetica,Arial,sans-serif" width="100%">
<tbody>
<tr>
<td align="center" width="100%" style="padding:0 15px;text-align:justify;color:rgb(76,76,76);font-size:12px;line-height:18px">
<h3 style="font-weight:600;padding:0;margin:0;font-size:16px;line-height:24px;text-align:center" class="title-color">Hi {{Name}},</h3>
<p style="margin:20px 0 30px 0;font-size:15px;text-align:center">Join our webinar to discover our latest release. Places are limited, so <b>register now</b>!</p>
<div style="font-weight:200;text-align:center;margin:25px">
<a style="padding:0.6em 1em;border-radius:600px;color:#ffffff;font-size:14px;text-decoration:none;font-weight:bold" class="button-color">Join the conference</a>
</div>
</td>
</tr>
</tbody>
</table>
</td>
</tr>
</tbody>
</table>
</td>
</tr>
</tbody>
</table>
</td>
</tr>
<tr>
<td align="left">
<table bgcolor="#FFFFFF" border="0" cellspacing="0" cellpadding="0" style="padding:0 24px;color:#999999;font-weight:200;font-family:Helvetica,Arial,sans-serif" width="100%">
<tbody>
<tr>
<td align="center" width="100%">
<table border="0" cellspacing="0" cellpadding="0" style="font-weight:200;font-family:Helvetica,Arial,sans-serif" width="100%">
<tbody>
<tr>
<td align="center" valign="middle" width="100%" style="border-top:1px solid #d9d9d9;padding:12px 0px 20px 0px;text-align:center;color:#4c4c4c;font-weight:200;font-size:12px;line-height:18px">
Regards,<br><b>The Awesome Team</b>
</td>
</tr>
</tbody>
</table>
</td>
</tr>
<tr>
<td align="center" width="100%">
<table border="0" cellspacing="0" cellpadding="0" style="font-weight:200;font-family:Helvetica,Arial,sans-serif" width="100%">
<tbody>
<tr>
<td align="center" style="padding:0 0 8px 0" width="100%"></td>
</tr>
</tbody>
</table>
</td>
</tr>
</tbody>
</table>
</td>
</tr>
</tbody>
</table>
</center>
</td>
</tr>
</tbody>
</table>
</div>
</body>
</html>
Your draft should look like this.
The hardest part is done! Now all you need to do is to select your template and send it through YAMM.
3. Select your template in YAMM UI and send it to your mailing list
Go back to your spreadsheet, then click Add-ons> Yet Another Mail Merge > Start Mail Merge.
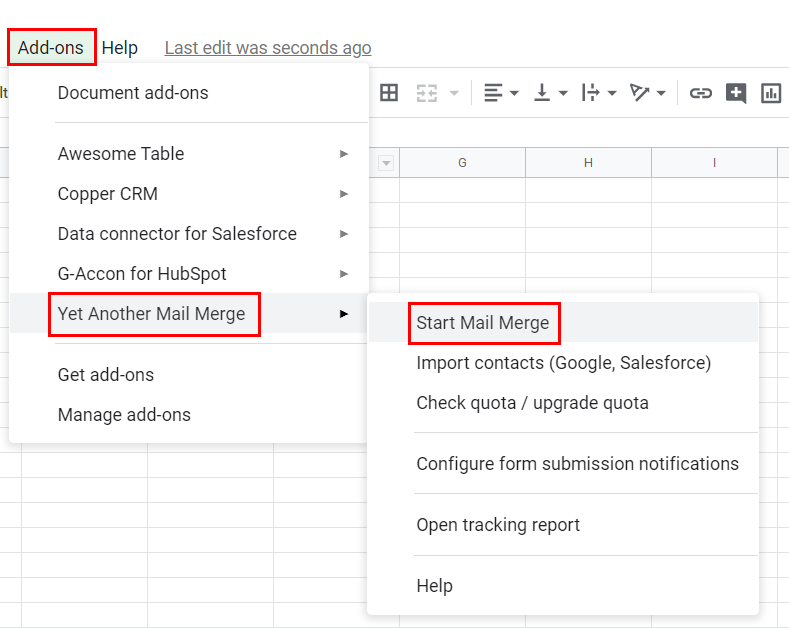
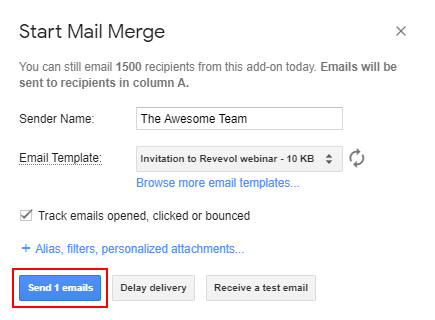
Then select your template and click Send emails.
After doing this, your recipients will get the following email.

As you can see, YAMM took your coded email template and replaced it with the right formatting. This feature will let you customize your emails indefinitely! Just make sure to use CSS properties that are supported by Gmail. You'll find the official list here.