

You need to personalize your emails if you want to optimize their impact. But that’s a super time-consuming process when you have hundreds or even thousands of messages to send out. It’s even more difficult if you don’t know how to mail merge from Google Sheets and Gmail.
It’s why a top-tier mail merge tool such as YAMM should be on your radar. With our tool, you’ll be able to mail merge on Google Sheets and Gmail with ease. In fact, you’ll be able to send out hundreds of personalized emails at once without having to enter all of the information yourself.
The best part? With Yet Another Mail Merge, you can use mail merge directly from your Google Workspace account. We’ll tell you how to mail merge in Gmail (and why you’d want to) below.
Mail merge using Google Sheets and Gmail: A quick definition
Let’s begin with a quick overview of what it means to do a mail merge using Google Sheets and Gmail:
Mail merging is a process that individuals and businesses use to send out emails in bulk without making it obvious to the recipients. Therefore, a mail merge is a tool that lets you send a similar document to multiple recipients. It serves as a bridge between a spreadsheet of user data and an email template.
There are several different benefits of mail merging in general and mail merging from Google Sheets in specific but we’ll get into that in the next section.
What are the benefits of doing a mail merge on Google Sheets and Gmail?
Mail merging, regardless of the platform you use to do it, is incredibly beneficial. However, when you mail merge with Gmail and Google Sheets, those benefits multiply manifold. The main reason for this is how easy it is to mail merge in Google Workspace. Let’s have a look at the primary benefits of mail merging as a process.
Save time
Perhaps the best reason to use a mail merge is to save yourself a ton of time. With one of these tools, you don’t have to manually add personalization details to every email that you send.
Instead, you can let your mail merge perform this task for you. That way, you have more time to focus on the other important parts of your business.
Improve personalization
By allowing automation to handle your personalization, mail merge tools also open up more possibilities in this area.
For example, you can confidently create templates that get super detailed with personalized information when you know that you’re not going to have to manually track down that data and type it into every email yourself.
The net result could be that your emails start getting more personalized. And that could lead to an uptick in your open and click-through rates.
Access all of your data in one place
This is another cool feature of mail merge tools like YAMM. With them, you can keep tabs on your most important metrics for email marketing performance in a single place.
That way, you don’t have to worry about juggling multiple tools just to get the information that you need to make more informed decisions.
Here’s what you need to get started with this Google mail merge tutorial
Thankfully, it’s super easy to get started with a mail merge tool. For our guide, this is all that you’ll need:
- A Gmail account
- Google Sheets
- YAMM Mail Merge (a lightweight Google Chrome add-on)
How to mail merge in Google Sheets and Gmail
Step 1: Create a list in Google Sheets to mail merge from
The first thing you need to do is put together a data file that contains information about your contact list. This typically always includes:
- Email addresses
- First and last names
But you can add any personalizing information that you want to your data file. You’re only limited by the information that you have on your contacts.
This opens up a ton of interesting possibilities for personalization, including:
- Business type and size
- Demographic information (age, gender, etc)
- Geographic location
- What you know about a person’s buying motives
- And more
You should note that you don’t need to use each type of information that you put into your Google Sheet in every email.
For example, you can add someone’s geographic location without having to reference it each time you send an email with that list.
That means it’s typically a better strategy to over-include information just so you can use it when you need it.
Here’s a sample so you can see what we’re talking about:

Step 2: Build your mail merge template in Gmail
Once you have a datasheet, you’re ready to put together your email template. You can do this directly in Gmail.
While putting together your template, you need to carve out the spaces where you want the data from your sheet to go. For example, take a look at this sample:
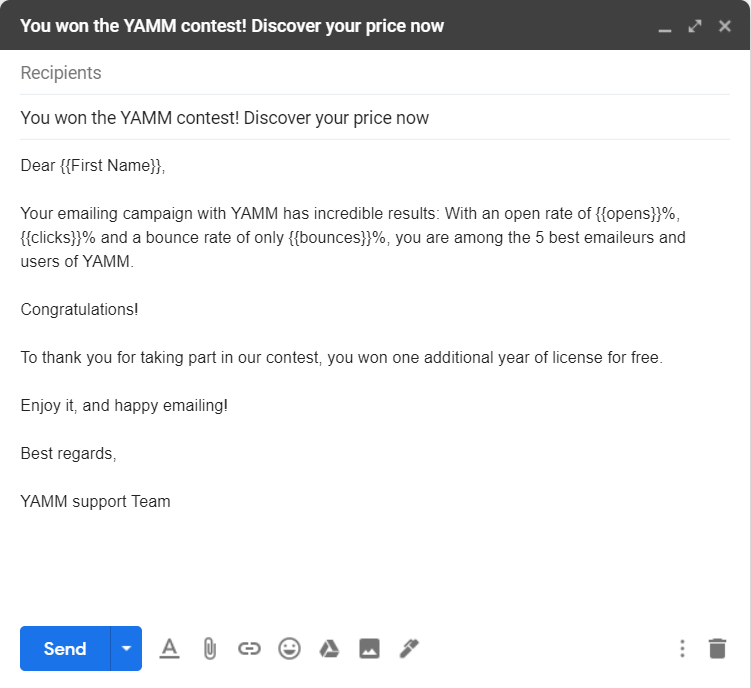
See these brackets {{ }}? That’s where the user data from your Google Sheet will go once you perform the mail merge with Gmail.
You can also see in the sample above that we’ve filled in {} these brackets with the keywords of “First Name”, “opens”, and “clicks”.
These weren’t chosen at random. Instead, they’ll correspond to the headings on your Google Sheets data page.
For example, the field marked {{First Name}} from the sample template above would auto-populate with the data column in your spreadsheet that’s titled “First Name”.
Step 3: Install Yet Another Mail Merge for Google Sheets in Google Chrome
Now you’re ready to add the YAMM extension to your Google Chrome browser, which you can do here.
You can get started with YAMM for free. But you’ll be limited to 50 recipients per day and won’t be able to use some of our value-adding features like footers, click-tracking, and email scheduling until you get a paid plan.
You may need to restart your Google Chrome browser after you’ve installed YAMM before using it the first time. But the rest of the installation process is easy. Just follow the steps you see on your screen to complete it.
Step 4: Use YAMM to perform your mail merge with Google Sheets
It’s finally time to perform your first mail merge. The instructions you see below will be for YAMM specifically, so if you’re not using our add-on, your process may be a bit different.
Begin by opening up the Google Sheets document that you put together in step one.
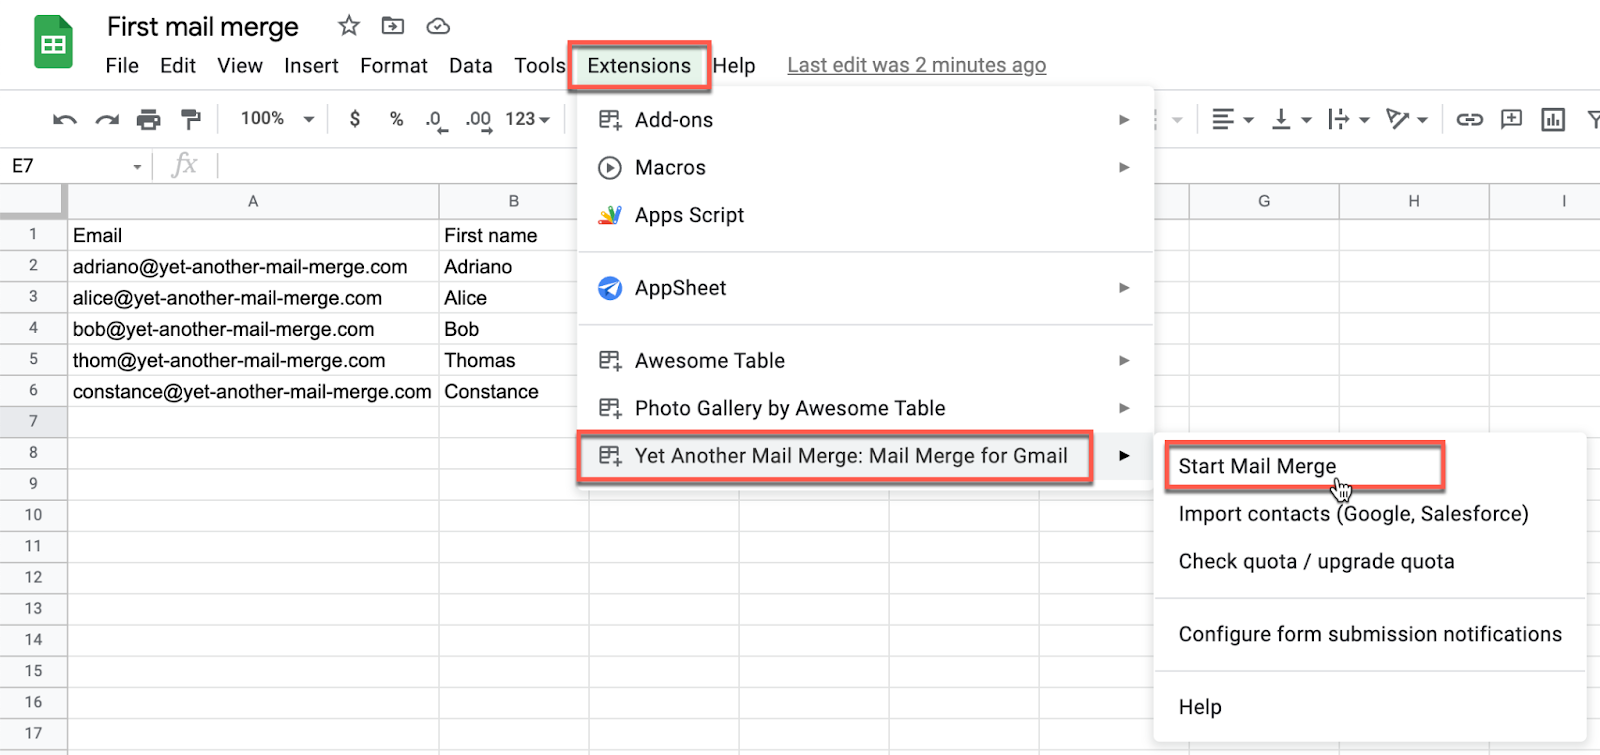
From there, navigate to extensions > Yet Another Mail Merge > Start Mail Merge
Here’s a screenshot of what that looks like:
Once you click on that, a window like this one will pop up:
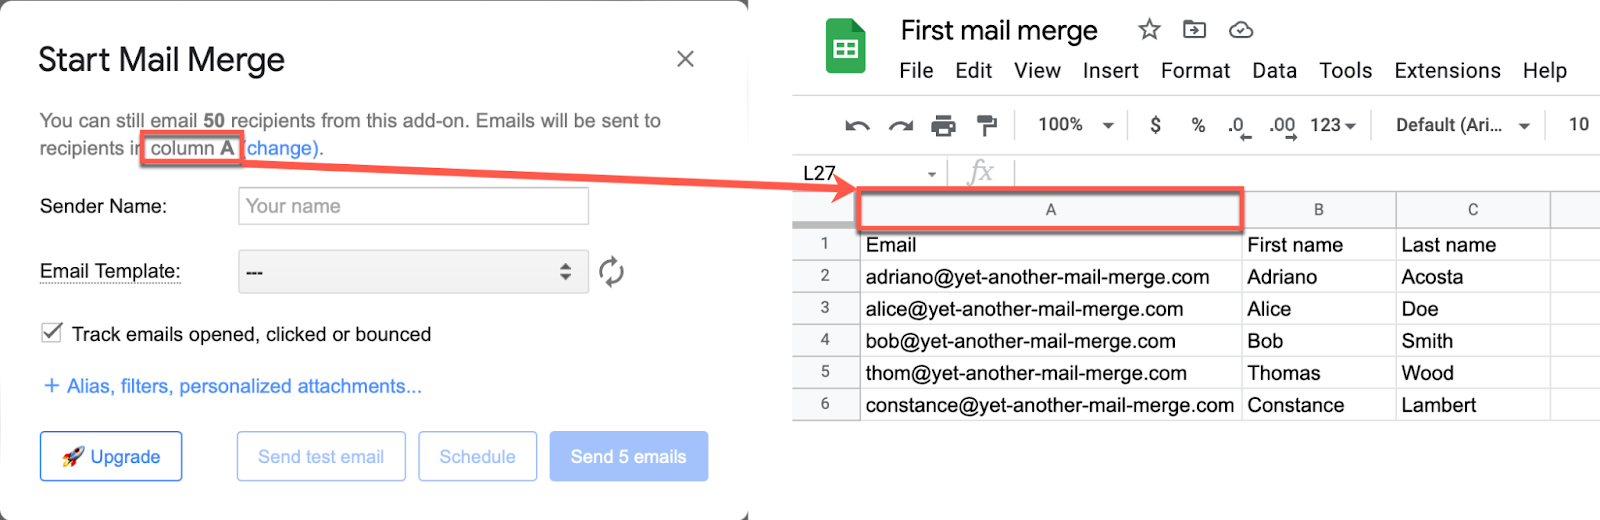
As you can see, you’ll be asked to input your sender name and choose the email template that you want to use for this mail merge campaign.
Note: you may need to hit the refresh button if your desired email template doesn’t pop up the first time.
After that, you’re ready to send out your emails. With YAMM, you can do that right away. Or you can schedule the emails to go out at a later time or date. This can be a good option if you want to make sure that your recipients receive your message at a good time.
Step 5: Track your results and adapt
That’s it! You’ve officially performed your first mail merge in Gmail using YAMM.
But your job isn’t necessarily complete. You’ll still want to keep an eye on the campaign to see how well it’s doing for you.
YAMM makes that easier to do. The process is as simple as:
- Checking the box that says “track emails opened, clicked, or bounced” before sending the mail merge
- Looking at the automated tracking report that generates after you do this
The tracking report looks like this:

As you can see, it gives you a simple way to keep tabs on the percentage of your emails that were received, opened, clicked through, and responded to.
You can use this data to figure out which email marketing strategies are working best for you and which could use some improvements.
Need help in removing duplicates on your Google Sheets? Learn how here.
Potential problems to look out for while using mail merge in Google Sheets and Gmail
A mail merge is a relatively straightforward tool. But you could still run into a few issues while using one. Here are two common problems that you should be aware of.
Typos
Typos can ruin the effectiveness of your mail merge campaigns.
Remember, data auto-populates from your Google Sheet to your Gmail template through matching keywords. If you mistype those keywords, the data won’t make it into your emails.
Plus, you need to be careful that there aren’t any typos elsewhere in your email templates. Because if you make a single mistake, it’ll be repeated across every email that you send, which is a bad look for your business.
Failing to verify email addresses before sending
It’s also important to make sure that the email addresses on your list are accurate before you attempt a mail merge. You can do that by looking at syntax, performing a DNS or IP lookup, or using an online email verification tool.
This matters because if you send out a lot of emails to faulty addresses, your bounce rate will be quite high. Over time, that can lead to a low sender score, which could cause your emails to go directly to your recipients’ spam inboxes.
Need help with Google Sheet Formulas? Learn these 9 useful formulas for efficiency.
YAMM makes it easy to unlock the full benefits of mail merge in Gmail and Google Sheets
Mail merge technology greatly simplifies the process of sending out personalized emails to large lists of contacts. If you’re ready to give it a shot, YAMM is here to help you merge emails in Gmail from Google Sheets.
Our lightweight mail merge add-on for Google Chrome is free to get started with and offers some powerful ways to take your mail merges to the next level.You can sign up for YAMM today to experience all of that immense business value for yourself.