
It’s time for the Holiday Party and you’re in charge, time to shine. All eyes are going to be on you to make the first party since COVID unforgettable.

If we’d known December 2019 was the last time we’d actually all be in the same building, I’m sure we would have been a bit quicker to push back on Karen’s sweater party. You’ve got two years of disappointment to make up for, and it all starts with this announcement email.
Let’s get started. Head over to Gmail and start composing a new email. Write your message, erase it all, write it again, stress about whether or not someone’s going to misread your tone (Karen), add an emoji (so she knows you’re joking 🤪), and then head over to Giphy.com to find the perfect GIF. Scratch that, email is serious business, and this is a serious company.

Okay, now you've polished the best holiday party invite of all time. You’re pretty proud (you should be, writing is hard, and the way you struck a perfect balance between party and business professional was exquisite 👍).
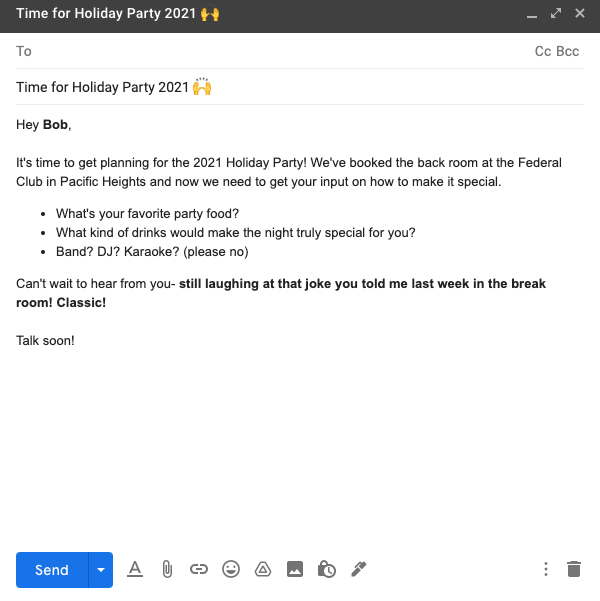
Let's get to sending. You’re not just going to paste everyone into a BCC- this is important. Who’s first? Toss Bob’s name into the to field and make sure to add a little quip at the end about that joke he told you in the break room to personalize it 😉.
Head over to ‘sent’ and copy everything from Bob and throw that into another email.
Start by changing the name (Hi Karen! 😊) and make sure to personalize it so you can reuse the same email without them knowing it’s copied from what you sent Bob. Reference how cute Karen’s kids were when they were hanging out in the break room the other day 😶.
Send this one and keep chugging along 🚂.
Grab the latest from the sent folder and copy it into another compose window.
Hold on. What’s in the first line? “Hey Bob?” but you sent that to Karen...

You forgot to change the intro, and now Karen realizes you just copied and pasted the same email you sent Bob. Shame. This just happened last month, and you told yourself you were going to be more careful next time.
This whole thing could have been avoided: you could have learned how to send an email blast in Gmail through a mail merge instead of sending your emails one by one. There are many ways to do this, but Gmail Mail Merge is among the easiest. You can send multiple email addresses personalized emails at once without them knowing. Let me show you how to send a mail merge in Gmail with the help of Google Sheets. Are you ready to add ‘skilled email marketer to your resume?
Getting some time off? Learn how to set out of office in Gmail
How do you send a personalized Mail Merge in Google Sheets and Gmail? A Yet Another Mail Merge Tutorial
There are tons of great reasons to use a mail merge: sending invites, sales emails, contacting students, coworkers, anything with multiple recipients really- it just depends on what you're emailing about (could that meeting have been an email? shoot...).
So long as you know how to send a mail merge in Gmail, it doesn’t matter if you’re using a plain old Gmail account or one from Google Workspace (AKA G suite / G Apps). YAMM & Gmail are fully compatible. We can send personalized email messages, subject lines, even full-on email campaigns with any Google Account.
How to do mail merge in Gmail in five simple steps with Yet Another Mail Merge (YAMM)
Step 1: Install the Yet Another Mail Merge Extension in Google Sheets
This first step is the easiest. Click here to install the Yet Another Mail Merge extension for Google Sheets.

Step 2: Open Gmail and draft your personalized email
To write a great bulk email we’ve gotta start by writing the actual email itself in Gmail. After all, if you don't know what you're writing, you don't know how you need to personalize it.
Go into Gmail and write your draft, but don't send it. Think about how you want the email to cater to each individual recipient with things like their name. Try to mark these in bold. We’ll replace them later with variable names like {{name}}. Get the formatting right, and save your email draft.
Step 3: List your contacts in Google Sheets
We need to get our contacts in a Google Sheet. If you’re a quick learner, just follow the example, or read through the instructions below.
Open Google Drive / Google Docs and make a Google Sheet. Alternatively, open the sheet where you store your contacts, You can also just type sheets.new into the URL bar and Google will quickly enter you into a brand new sheet for you to work your magic.
Add a row for each of your multiple recipients. Remember how I asked you to think about how you want to cater each individual email? Well, now it's time to actually fill that in.
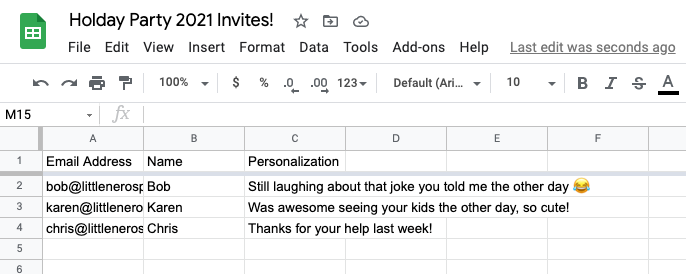
Add a column for each of the personalized variable fields you will use and fill it in for each contact.
The first column should be the email, and each subsequent column is used for personalization fields. Column names are important. Use simple names because (surprise surprise) you're going to need them in the next step. Don't use ‘first_name’ when just ‘name’ will do- accuracy is critical. The name should be easily remembered and typed without error.
Step 4: Personalize your Gmail Template with what’s in your Google Sheet
Alright, now it's time to go back into Gmail and connect Google Sheets with our email template. Each of those columns is a merge field, and we’re going to use each to personalize the email.
Replace what you want to personalize in your email with the column names from your sheet wrapped in double curly braces.
If you start your email with ...
Hi Bob,
...replace that with:
Hi {{Name}}.
Here’s how our email from before looks now that we’ve updated the personalization fields.

Step 5: Send mail merge emails to multiple recipients in Gmail! 🛫
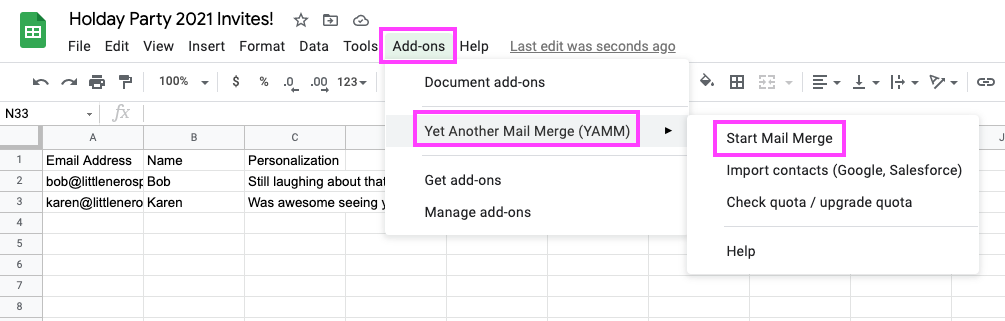
Time for the fun part. Open YAMM from the add-ons menu and hit ‘Start Mail Merge.’
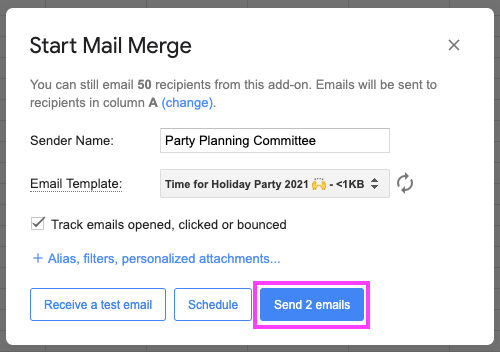
Check everything- this is the point of no return! After you click send, it won’t be possible to cancel the send. Enter your Sender Name and choose your Gmail draft. I recommend sending a test email first, and once you’re happy, click 'Send emails' to start your mail merge.
Follow these steps, and I am sure this will be the best holiday party email blast of all time. If you’re hungry to learn more than just how to send a mail merge with Gmail, YAMM has tons of popular features, even letting you track emails, see email opens, clicks, and more. Usage is free for 50 emails a day but upgrade to a paid account, and you’ll access higher sending limits. You’ll still have to stay within Gmail sending limits, though.
Install the YAMM extension today and get started, what are you waiting for?
Use your Microsoft Word and Excel files in Google Docs and YAMM extension
Do you use Microsoft Excel and Word? Import your files and use them in Google Docs and YAMM. We wrote these guides to walk you through it: