How to Use Gmail SMTP Server and Gmail Settings
The use of Gmail SMTP Server together with the settings for Gmail is done through a straightforward process that is viable to be finished in a few easy steps.
Listed below are the steps on How to Use Gmail SMTP Server and Gmail Settings.
- Log in to the Gmail account. The first step on using the Gmail SMTP Server and Gmail settings is to access one’s gmail account. The user needs to have initially created a profile on Gmail in order to do it.
- Click on the gear icon in the top-right corner of the inbox, and select "Settings" from the dropdown menu. The user needs to navigate to the settings by clicking on the gear symbol, which is located in the upper right-hand corner of their inbox in order to begin. The dropdown menu must be utilized to be able to click on the "Settings" tab.
- Click on the "Accounts and Import" tab. The user must navigate to the "Accounts and Import" after exploring through the Gmail settings.
- Click on "Add another email address" Under the "Send mail as" section. The user is directed to a section where they are able to find the label “send mail as”. Users need to click on that label in order to locate another label, “add another email address”. Users need to click on that label as well.
- Enter the email address desired to use as the sender address, and click "Next". The user is prompted with a text field where they need to input the email address of their choice. The email address they provided is going to be utilized as the sender address. Users need to click “next” after providing the email address.
- Choose "Send through Gmail (easiest to set up)" and click "Next". The user is going to notice options on how to send the email. They need to select the one which says “send through Gmail (easiest to set up)” from the choices and click on “next” afterwards.
- Enter one’s name as preferred to appear in outgoing emails, and ensure that the "Treat as an alias" checkbox is checked. The user must key-in the name which they want to be displayed on the outgoing emails. User needs to ensure that the checkbox entitled “treat as an alias” is ticked, else the name provided is not going to appear on the messages sent out.
- Click "Next Step." The user needs to click on “Next step” after providing the send out name and ticking the “treat as an alias” option.
- Enter "smtp.gmail.com" In the "SMTP Server" field. The user must locate the field where the label “SMTP Server” is displayed. They need to key-in the address “smtp.gmail.com” in the field afterwards.
- Enter the full Gmail email address In the "Username" field. The user needs to type in the entire email address in the text field intended for “username”.
- Enter the Gmail password in the "Password" field. The password must be provided on the subsequent field once the username is provided.
- Enter "587" In the "Port" field. Users are going to notice another field which asks for a port number. They need to key-in the numbers “587” on the field. Such numbers are static and are applied every time the Gmail SMTP server is utilized.
- Ensure that "Secured connection using TLS" is selected. Users need to make sure that the checkbox which says “check connection using TLS” is ticked.
- Click "Add Account." The user must click on the button which says “add account” to conclude the process. It is typically located in the area where the label “port” is seen.
The Simple Mail Transfer Protocol or SMTP, is a method of exchanging data that allows electronic mail or email messages to be sent and received through computer networks like the internet. Email servers and clients such as Microsoft Outlook rely on SMTP to relay messages among systems. It is initially transmitted to an SMTP server when an email is written. The email is forwarded to the recipient's server over the SMTP protocol after that. POP3 and IMAP are used by the recipient's email server to obtain messages and forward them to the user's inbox. SMTP is a client-server protocol that performs on a textual basis. It is able to send and receive plaintext data using TCP port 25, and uses TCP ports 465 and 587 for encrypted communication. SMTP relies on a back-and-forth exchange of instructions and answers between the client and server, similar to HTTP. Email commands such as HELO, MAIL FROM, RCPT TO, DATA, and QUIT are all examples of such instructions. They each identify the sender and the receiver, respectively, before sending the message itself and ending the session.
A user must be able to send emails from their new email address by utilizing the SMTP server and settings provided by Google. Such a phenomenon is achieved upon the completion of these procedures which enumerates the ways on how to find the SMTP Gmail settings. Knowing how to use SMTP for Gmail is a helpful course of action for people and companies who wish to utilize a personalized email address. These companies benefit from the dependability and security of the Google email service at the same time. The said function is found under Gmail's Advanced Settings.
What is the Gmail SMTP Server Address?
Gmail's Simple Mail Transfer Protocol or SMTP server address is smtp.gmail.com. It is an internet protocol that sends emails from one location to another across the Internet.
It is necessary to configure the email client software with Gmail's SMTP settings to utilize the protocol. The server is particularly useful for individuals who need to send large volumes of emails and require a reliable connection or individuals who need to maintain communication with a large number of contacts over an extended period. The security and reliability of Google's servers make them a highly attractive option for businesses and organizations. Additionally, individuals take advantage of the various features offered by Gmail, such as the ability to auto-save draft emails and manage contact lists by using Gmail's SMTP server.
The potential configuration for Gmail’s SMTP server requires the input of the username and password for the desired Gmail account and the specification of port numbers. However, users need to have a working Gmail account in the first place to start such a process. Additionally, they need to religiously follow the steps provided in utilizing the SMTP server to assure a successful outcome. Gmail's SMTP server is utilized to compose and send emails once the proper configuration has been established.
Gmail's SMTP (Simple Mail Transfer Protocol) server is a great tool to be used for sending and receiving emails. Sending electronic messages from a Gmail account to various email addresses is a trustworthy and safe method for online communication. Users are able to deliver a lot of messages using the Gmail SMTP server without worrying over email delivery issues or security concerns. Gmail SMTP server effortlessly connects with other Google services, like Google Drive and Google Calendar, making it a practical option for individuals that utilize a variety of Google services. The Gmail SMTP server is undeniably a preferred option for both individuals and organizations because it is simple to set up, utilize, and uphold.
How to Integrate Gmail SMTP Server to WordPress?
Listed below are the steps on How to Integrate Gmail SMTP Server to WordPress.
- Install and activate the "WP Mail SMTP" plugin on the WordPress site. Users must install and activate the "WP Mail SMTP" plugin in order to set up WordPress to integrate Gmail SMTPserver to wordpress. The plugin is viable to be installed by logging into one's WordPress dashboard, going to the "Plugins" area, and looking for "WP Mail SMTP." Users need to select "Install" and then "Activate" to begin the installation process after locating the plugin. Users set up the plugin from the WordPress dashboard when it has been activated and begin using Gmail SMTP to send emails.
- Go to "Settings" -> "WP Mail SMTP" in the left-hand menu. Users need to navigate through the settings menu and click on the label which says “WP Mail SMTP.'' The label is normally located on the left-side area of the menu.
- Enter the email address needed to be used for sending emails from the website in the "From Email" field. The user must type the preferred email address in the prompted field which says “From Email:” The email address provided is going to be used for sending emails from the site.
- Enter the desired name to appear as the sender of the emails in the "From Name" field. The name which the user wants to appear in every email they send as the sender's name must be keyed-in on the next field labeled as “From Name:”
- In the "Mailer" section, select "Other SMTP" as the mailer. The user needs to choose their preferred mailer once the sender name is set. Users need to navigate through the mailer section and look for “other SMTP” which they need to select.
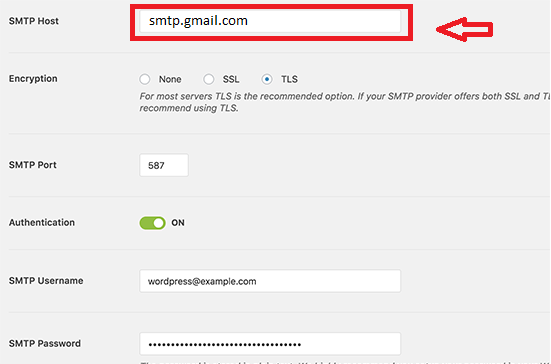
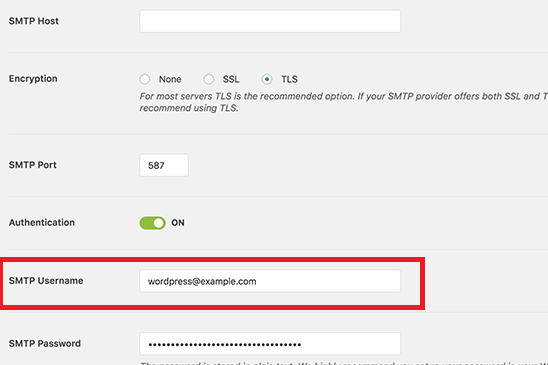
- In the "SMTP Host" field, enter "smtp.gmail.com." The user needs to type the words “smtp.gmail.com” on the text field intended for the SMTP host.
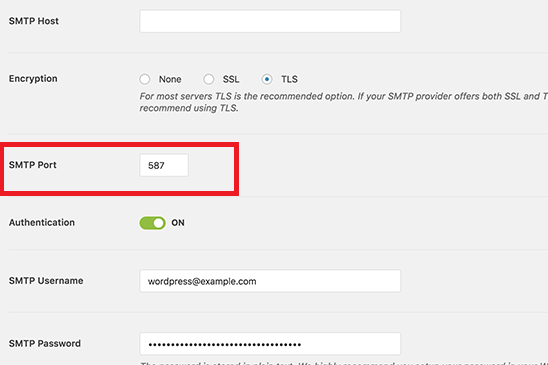
- In the "SMTP Port" field, enter "587." The user needs to subsequently key-in the numbers “587” in the field asking for an SMTP Port.
- In the "Encryption" field, select "TLS." Users must navigate to the “encryption” field to click on “TLS.”
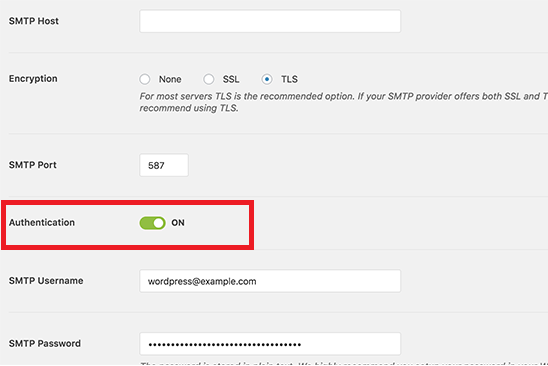
- In the "Authentication" field, select "Yes: Use SMTP authentication." An authentication is required before saving the entries provided starting from the first step of the process. Users must choose the option stating “yes:use SMTP authentication” to proceed to the next step.
- In the "Username" field, enter one’s full Gmail email address. The user must fill-in the username field using one’s preferred email address for Gmail.
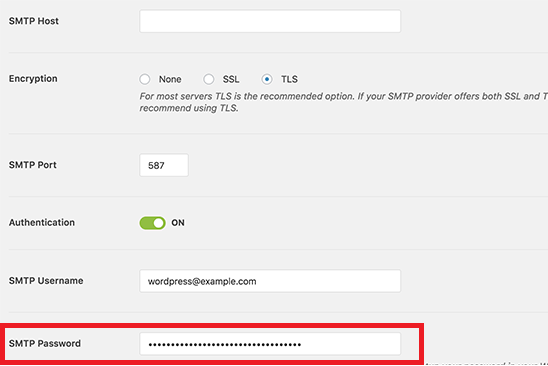
- In the "Password" field, enter one’s Gmail account password. The user needs to input the password on the password field. The password used for the Gmail email account must be the same password used in the Gmail account.
- Click the "Save Settings" button. Users must click-on the button which says “save settings” in order to finalize the integration process.
The SMTP or Simple Mail Transfer Protocol is a common protocol used to transmit emails between servers over the internet. It holds a lot of benefits for Wordpress in particular. WordPress sites utilize SMTP to deliver emails such as alerts, contact form submissions, and password reset emails. It offers the advantage of improving email deliverability for wordpress specially when SMTP providers such as Google or Sendinblue are utilized. They improve the deliverability of emails sent from a WordPress website.
Recipient email systems are less likely to mark them as spam by sending emails over a reputable SMTP server. SMTP for WordPress enhances email security, which is an additional benefit. Its servers employ encryption technologies such as SSL and TLS which protects the security of email transmissions over the internet. SMTP allows more dependable email delivery. SMTP servers are built to manage high levels of email traffic, reducing the likelihood that emails sent from a WordPress site are going to be delayed or lost in route, which is extremely important for membership and e-commerce websites that largely rely on email alerts.
How to Configure WordPress for Sending Emails with Gmail SMTP?
Listed below are the steps on How to Configure WordPress for sending emails with Gmail SMTP.
- Install and activate the plugin "WP Mail SMTP" on the WordPress site. Installing and turning on the "WP Mail SMTP" plugin is the first step in setting up WordPress to send emails using Gmail SMTP. The plugin is a well-reviewed choice for sending emails from a WordPress website using the SMTP server for Google. It is viable to be customized through the WordPress dashboard after being installed and enabled. Users are able to make sure that their WordPress site is delivering emails through Gmail's SMTP server efficiently and safely if the WP Mail SMTP plugin is employed.

- Go to the "Settings" -> "WP Mail SMTP" page and click on the "Email Test" tab. WordPress must be properly configured to use Gmail SMTP for email sending. Users need to open their WordPress dashboard and go to the "Settings" where they are able to locate the "WP Mail SMTP" page in order to do it. They need to choose the "Email Test'' tab on the same page to make sure that the plugin is set up properly and that emails are being delivered successfully.
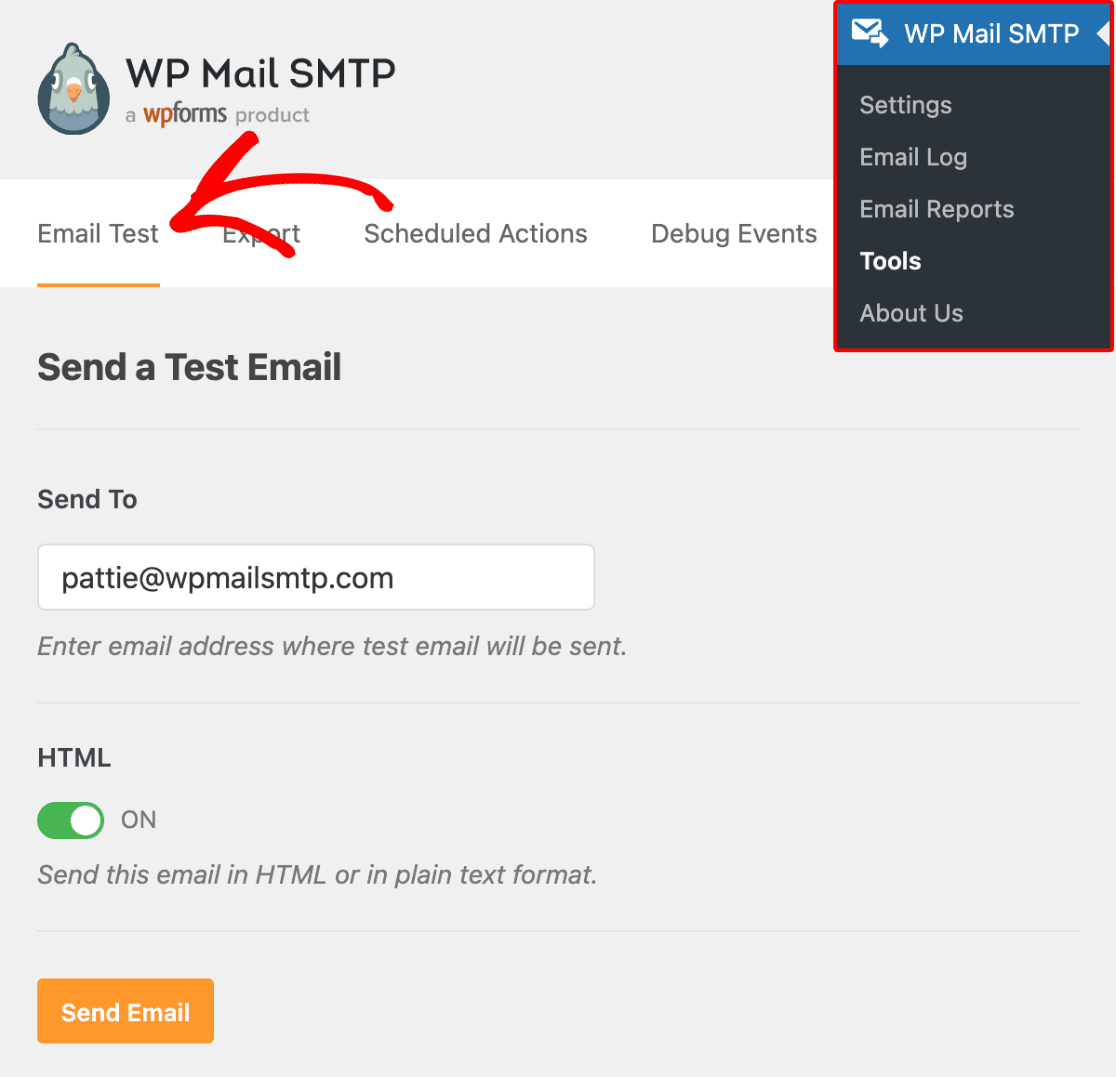
- Enter the email address to send a test email to and click the "Send Email" button. The process is going to verify that the website is able to send emails. Users must click on the "Send Email" button after entering the recipient's email address to officially send a test email. It means that the plugin is set up properly if the test email is sent successfully, from which users are able to begin utilizing Gmail SMTP to send emails from the WordPress website.

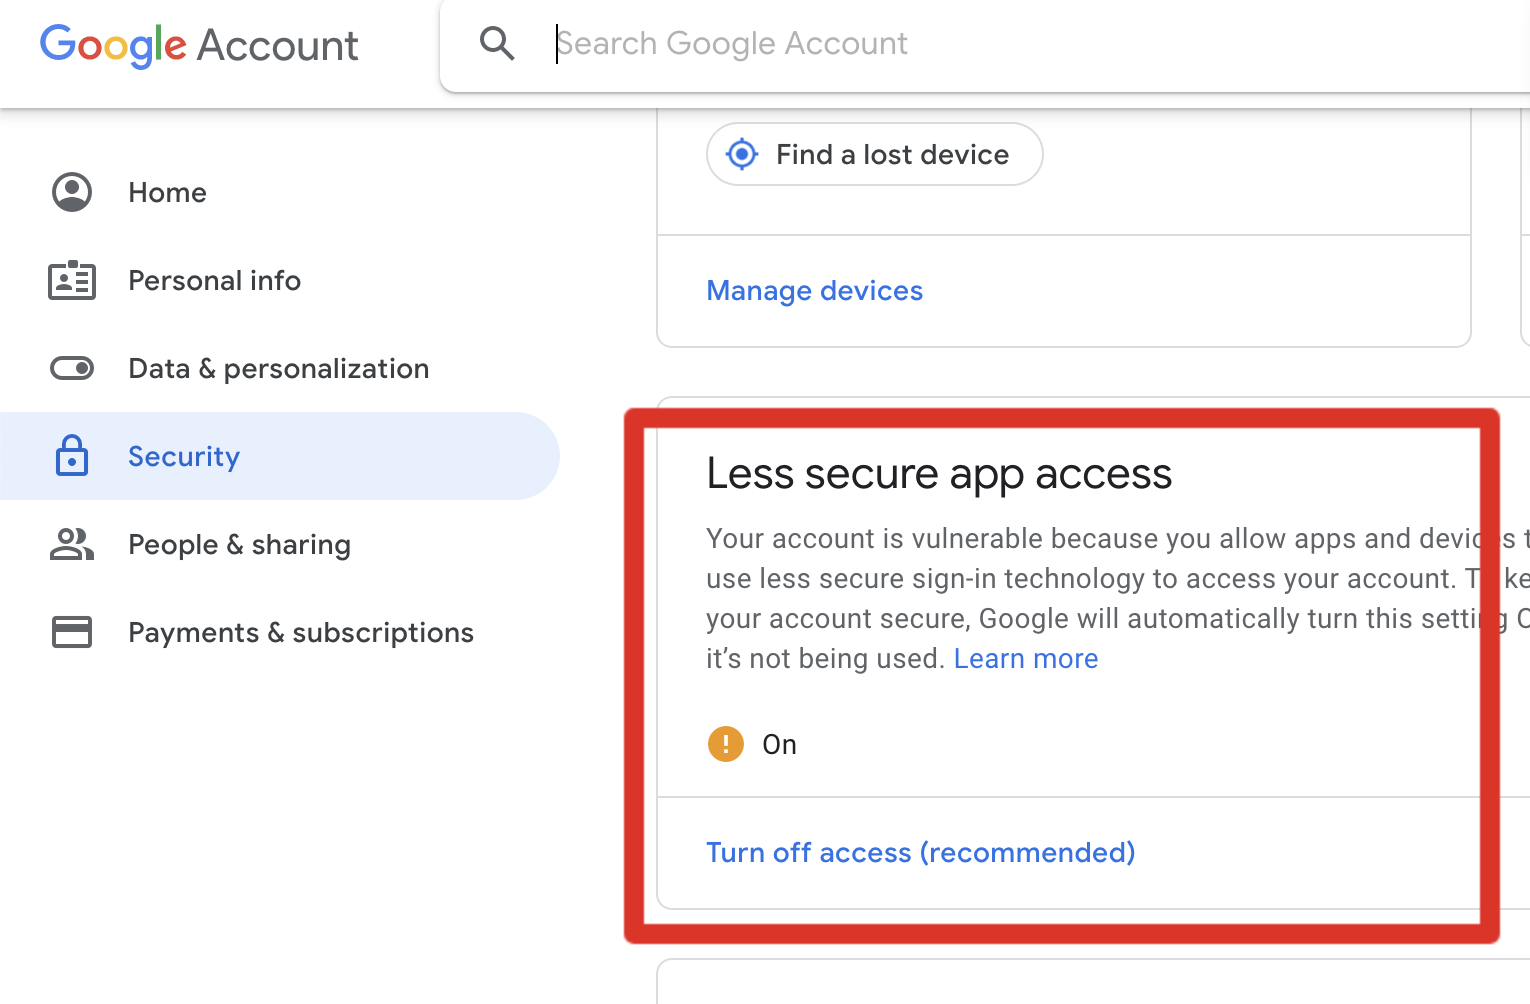
- Go to the Google account and enable "Less secure apps" by following the link, “https://myaccount.google.com/lesssecureapps” Users need to turn on or allow access for less secure applications by going through the settings of their Gmail account where they are able to locate the the “security” section. Users either need to tick on a radio button or click on an “on-off” switch to enable such functionality.
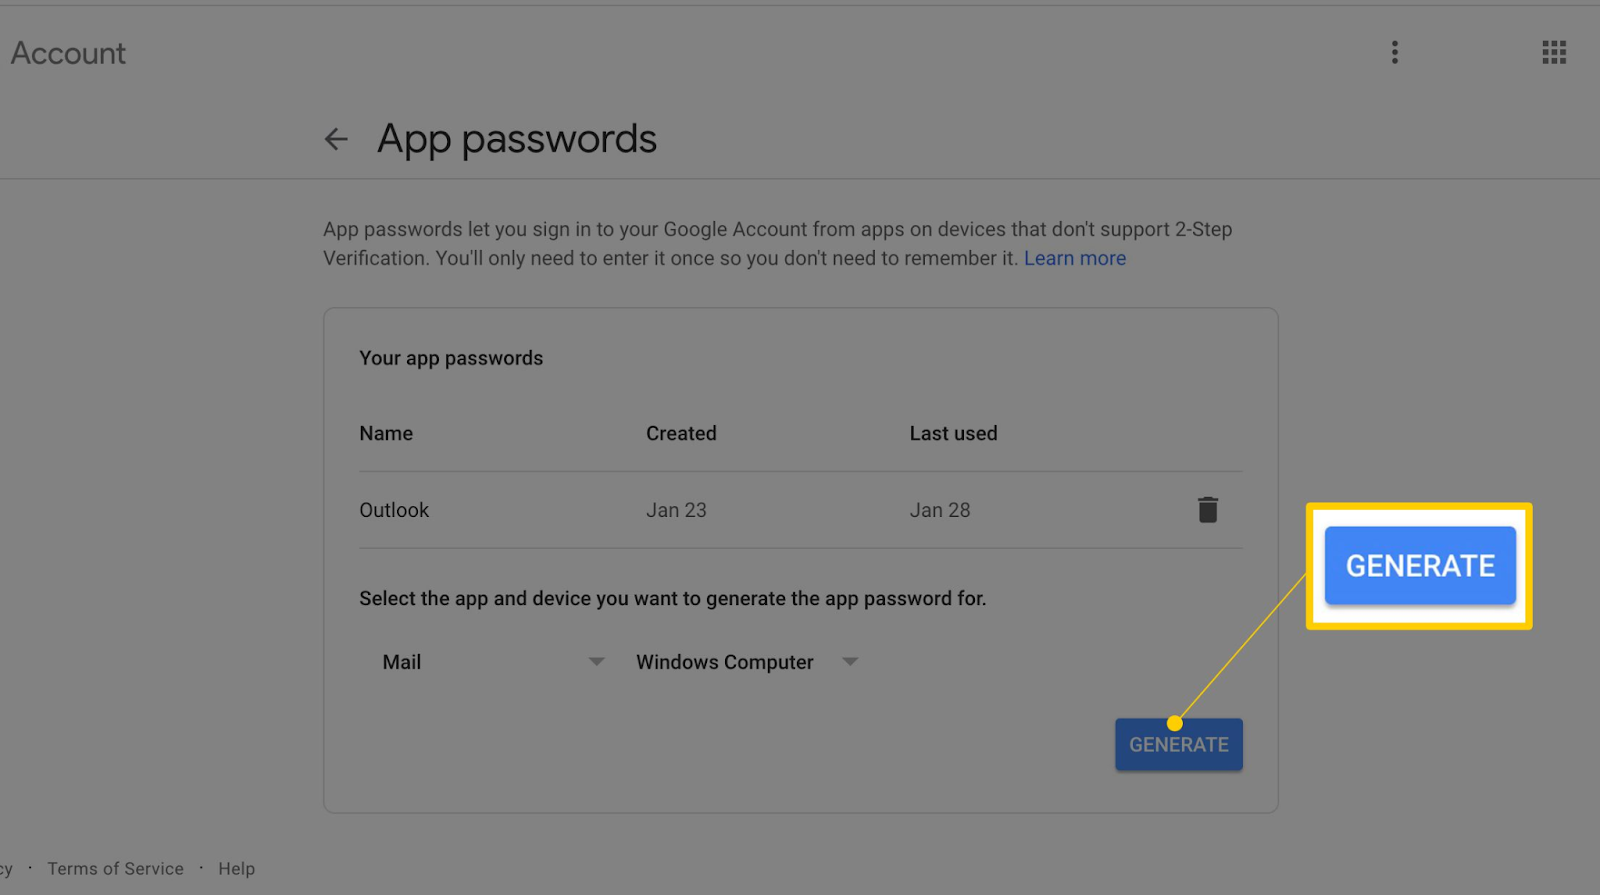
- Generate an app password by going to the link, “https://myaccount.google.com/u/1/security.” Users are able to set authentication details on their google account by navigating to the “security” tab and then to “passwords.” The “App passwords” is located under the “password” tab, and from there, the desired authentication info must be encoded.

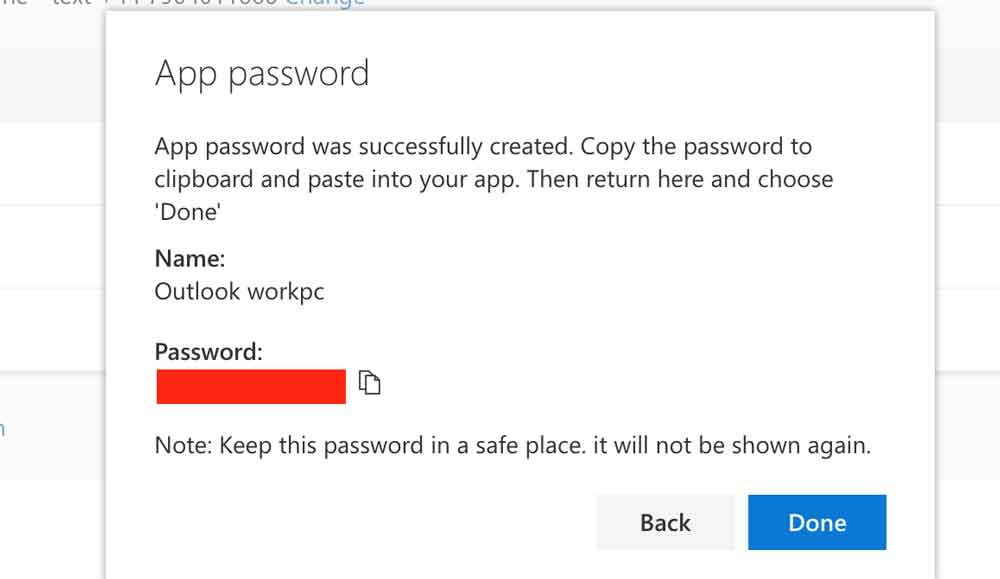
- Click on "App passwords", select "Mail" and "Other (Custom name)", and enter a name for the app password. Click on "Generate." Passwords for online accounts are usually alphanumeric. It means that the authentication code created must contain letters and numbers at the same time. There are instances when symbols need to be included in the password to strengthen security.
- A password is going to be shown. Copy the password to the clipboard as one is likely to need it later. Users must create a password in Gmail and copy it to the clipboard in order to set up WordPress to send emails using Google SMTP. The password is going to be entered in the WordPress settings to link the Gmail account and allow sending emails from it.
- Go back to the "Settings" -> "WP Mail SMTP" page and scroll down to the "Mailer" section. Select "Other SMTP" as the mailer. Users need to go to "Settings" in the WordPress dashboard and then to the "WP Mail SMTP" page to set up WordPress and be able to send emails using Gmail SMTP. They need to choose "Other SMTP" as the mailer by swiping down to the "Mailer" column afterwards. Users then need to enter the Gmail SMTP information to send emails from the WordPress website.

- Input "smtp.gmail.com" in the "SMTP Host" field. The “smtp.gmail.com” address is true for all SMTP Gmail accounts, which means that it is static and non replaceable.
- Enter "587" in the "SMTP Port" field. All SMTP ports have a standard value to be encoded, which is “587.” However, for SSL ports, the static values must be “465.”
- Tick on the "TLS" in the "Encryption" field. The encryption field must be set to the recommended option, which is the “TLS.” It implies that the SMTP provider is both run by SSL and TLS functionality. On the other hand, the “SSL” must be selected accordingly, for providers who solely use SSL.

- Opt for "Yes: Use SMTP authentication" in the "Authentication" field. There are some interfaces where switch buttons are utilized as a mode of selection for authentication instead of checkboxes. Users, in such cases need to click on the switch button to select “on” which means that the authentication is bound for SMTP.
- Key-in complete full Gmail email address in the "Username" field. The SMTP username must be keyed-in in the text field beside it. The username must be the same email address used in gmail.
- Paste the app password generated earlier in the "Password" field. Users need to input the password for the SMTP. It must be identical to the app password created from step no. 6.
- Click the "Save Settings" button. The user is now able to conclude the configuration by clicking on the “save settings” or “save changes” button.

What are the WordPress Plugins for WordPress SMTP Configuration?
A plugin for WordPress, known as an SMTP plugin, facilitates the integration of a website with an SMTP server to transmit emails. The plugins usually provide one or two integration methods and are compatible with many email service providers.
Listed below are the WordPress plugins for WordPress SMTP Configuration.
- WP Mail SMTP: WP Mail SMTP is a prominent and free for all plugin for WordPress that enables users to send emails by connecting to an SMTP service. WP Mail SMTP is ADDITIONAL known as WP Mail SMTP. It comes with eight different SMTP connectors already built in, one of which being Gmail, and a setup wizard to help with the setting. Support is added for other operating systems when one upgrades to the premium version. The plugin requires the user to explicitly enter the server details as well as their credentials In order to connect to different SMTP providers.
- SMTP Mailer: SMTP Mailer is a plugin for WordPress that enables users to make connections to the SMTP servers of any email service provider. Users are likely to connect to SMTP servers using any email service provider. Users are able to send test emails and specify the SMTP port and encryption type for their email messages, as well as configure and test their SMTP settings. The plugin is compatible with a variety of widely used contact form builders, including Contact Form 7, Jetpack, and Formidable Form Builder. It is a versatile alternative to consider for those who are looking for a WordPress SMTP plugin that is compatible with a variety of contact form builders.
- Post SMTP: Post SMTP is a robust email plugin for WordPress that includes sophisticated functionality to enhance email delivery. Post SMTP known as "Post SMTP." Using either OAuth2 or API connection gives consumers the ability to link their website to their SMTP provider. MailChimp Transactional Email, Gmail, and Yahoo Mail are just some of the prominent email services that are supported by the free version. Support for Better Email Logger, Amazon Simple Email Service (SES), and Office 365 is added when users upgrade to the premium edition. The plugin does not provide manual setting of the SMTP server because of the security risks involved. Thus, it is not appropriate for users who do not employ one of the supported providers. API integration, on the other hand, allows it to get over the normal SMTP port restrictions that are imposed by some shared hosting providers. Additionally, Post SMTP comes with a diagnostic tool that is used for troubleshooting and logs that are used to trace emails that have been sent. A fallback SMTP service has been set up in the event that delivery is unsuccessful.
- FluentSMTP: FluentSMTP is a free plugin that enables users to connect with several email service providers, including Amazon SES. Among these providers is Google Apps for Work. The plugin has a great deal of adaptability and makes it attainable to automatically route emails to the right provider based on the "from" email address. Amazon Simple Email Service (SES), Gmail, Google Workspace, Outlook, SendGrid, Mailgun, Sendinblue, Pepipost, SparkPost, and Zoho all provide native connectors that users are able to make use of. Additionally, it is viable to connect manually to other SMTP providers like Yahoo and Zoho. The customer is able to monitor their email performance and consumption thanks to the logs and reports that are provided by FluentSMTP, which are included with the service. The ability to view the email log is helpful for a variety of purposes, including email storage, auditing, and debugging throughout the construction of the website. FluentSMTP is one of the most popular WordPress plugins for SMTP configuration that allow sending emails from a WordPress site using a custom SMTP server.
Why to Create a Google App for Using Gmail SMTP with WordPress?
A Google App is an online application developed by Google for a specific purpose. It performs tasks such as managing emails, scheduling appointments, and tracking data. It is necessary to create a Google App so that the two services are able to communicate securely and without problems. The Google App allows access to settings like security protocols and port numbers so that WordPress successfully sends emails through Gmail's SMTP servers. Google Apps for Mail Merge provides additional features such as automated email campaigns, advanced analytics, and more.
How does Gmail SMTP help for Mail Merge?
Gmail SMTP is an important tool for mail merge, allowing users to send bulk emails with personalized content. It makes it easier and faster to communicate with large groups of people at once, helping businesses save time and effort. Mail Merge uses Gmail SMTP protocols for sending data through a secure connection, so the information is kept safe during transmission. Companies are able to quickly share important messages, updates, or promotions with their clients by using it. Mail Merge is a powerful tool that helps businesses increase efficiency and reach more potential customers. Using Gmail SMTP for mail merge allows people to track the status of their emails, including whether they were delivered, opened, and clicked. Gmail SMTP is a powerful tool for mail merge because it lets users personalize, automate, track, protect against spam, and work with tools from other companies.
What are the Requirements to Find SMTP Server for Gmail?
The following information is needed to find the SMTP server for Gmail.
- Gmail account login credentials: It typically consists of username and password. The gmail account login information is employed to permit and validate the user as the email account's credible owner. It evaluates whether the user is permitted to transmit communication from that profile or not.
- Gmail SMTP server address: The SMTP server is “smtp.gmail.com” as a rule. it is the web-based location of the gmail SMTP server where the user needs to join with.
- Gmail SMTP port which is “587” or “465” for SSL, by default: The Gmail SMTP port number is the port the user utilizes to connect to the Gmail SMTP server. The standard port number is “587”, but SSL is used with port “465.”
Does Gmail SMTP Require Two-factor Authentication?
Yes, Gmail SMTP supports two-factor authentication or 2FA. The two-factor authentication is highly recommended to enable SMTP for a Gmail account and foster better security. Two-factor authentication is an additional layer of protection that requires users to submit two forms of authentication in order to access their account. Users must supply both a password and a security key. Users are required to supply a verification code that was either created by an authenticator app, retrieved by text message, or gained using a physical security key in addition to providing the password.
These authentications provide an additional barrier to prevent unauthorized users from accessing an online account. A user who has two-factor authentication turned on, for example, must create an app password instead of using their regular Gmail password when setting up Gmail SMTP for WordPress. It is because the user is using their regular Gmail password which is more susceptible to security breaches. An app password is a one-time password that is used to sign in to a Gmail account when a regular password won't work. It is likely to happen with third-party email clients or WordPress plugins, for instance.
An example of such a situation is when a person is trying to send an email from a third-party email client. Given the present age of online dangers and cyberattacks due to the popularity of phishing and other scams of the same nature, turning on two-factor authentication for a Gmail account is a necessary extra step to keep an account safe from unauthorized access. Users are able to protect the password to a regular Gmail account while still allowing WordPress to send emails using Google's SMTP servers by utilizing an app password for SMTP authentication. It is accomplished by using app-specific credentials, because app passwords are specific to each program, and is technically conceivable, providing deeper grounds for Email Security.